
In-Depth Inferno Guide
Introduction
Note: Double Damage potions & Banker Pet do NOT work in the Inferno.
Without a Doubt the HARDEST PVM challenge in runerealm is the Inferno.
A suped-up grueling, long, and extremely difficult 30 wave instance it causes a lot of experienced players grief.
I, ArchVillain, am here to shed some light on the Inferno and show you wave by wave, step by step, how to conquer the Inferno first try, rather than your 10th or 20th.
So... What is the Inferno even?
As mentioned, the Inferno is a 30 wave instance akin to the fight caves but much much more difficult. The first 28 are the regular fighting of progressively harder mobs until you reach a triple-Jad fight (Yes... you fight three jads at the same time) before finishing off with a final boss fight with Zuk...
And then you can land the sweet, sweet prize of the Best in Slot melee cape along with the sense of accomplishment that comes from beating the Inferno.
Requirements
You need to sacrifice a firecape first and foremost before you can start your attempts
Because of the difficulty even in max gear the Inferno has the steepest requirements of any boss or minigame. That being said if you are newer or don’t have the requisite minimum stats or gear it is better to go get those before attempting the Inferno.
Stat Requirements
99 Range
99 Hitpoints
99 Defence
99 Prayer
(recommended) 92 Mage [for blood barrage]
(Ironman) 81 Herblore [For Saradomin brews + Restores]
Gear Requirements
This is what I would consider the minimum gear for the inferno:

Of course you can upgrade, however this is the bare minimum to effectively beat all 30 waves. You will see that you have a ranged blowpipe setup, which you will use for every mob (even zuk if you wish).
NOTE: you may also bring along a magic staff/top switch (such as a toxic staff of the dead + ancestral top etc.) for blood barrages if you choose to bring the runes for that.
Inventory
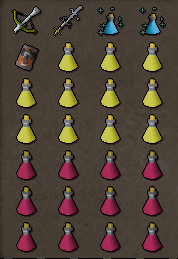
This Inventory is for a RANGE SETUP as a first and foremost note.
That being said it is fairly standard with sara brews + restores being your main source of food, and a SGS (saradomin godsword) for a spec. You also can bring a crossbow switch for ZUK if you choose (the merit being the ruby bolts (e) spec.) This is not necessary and you may opt instead to bring a couple more potions or even a Magic switch + runes for blood barrage for extra heals.
Finally you will want divine ranging pots for when you reach triple jad and Zuk.
Great, let's dive into learning about the mobs of the inferno and the safespot.
Inferno Layout
In my opinion the hardest part of the inferno is getting to triple jads, and as such it is necessary to spend a fair bit of time going over the layout.
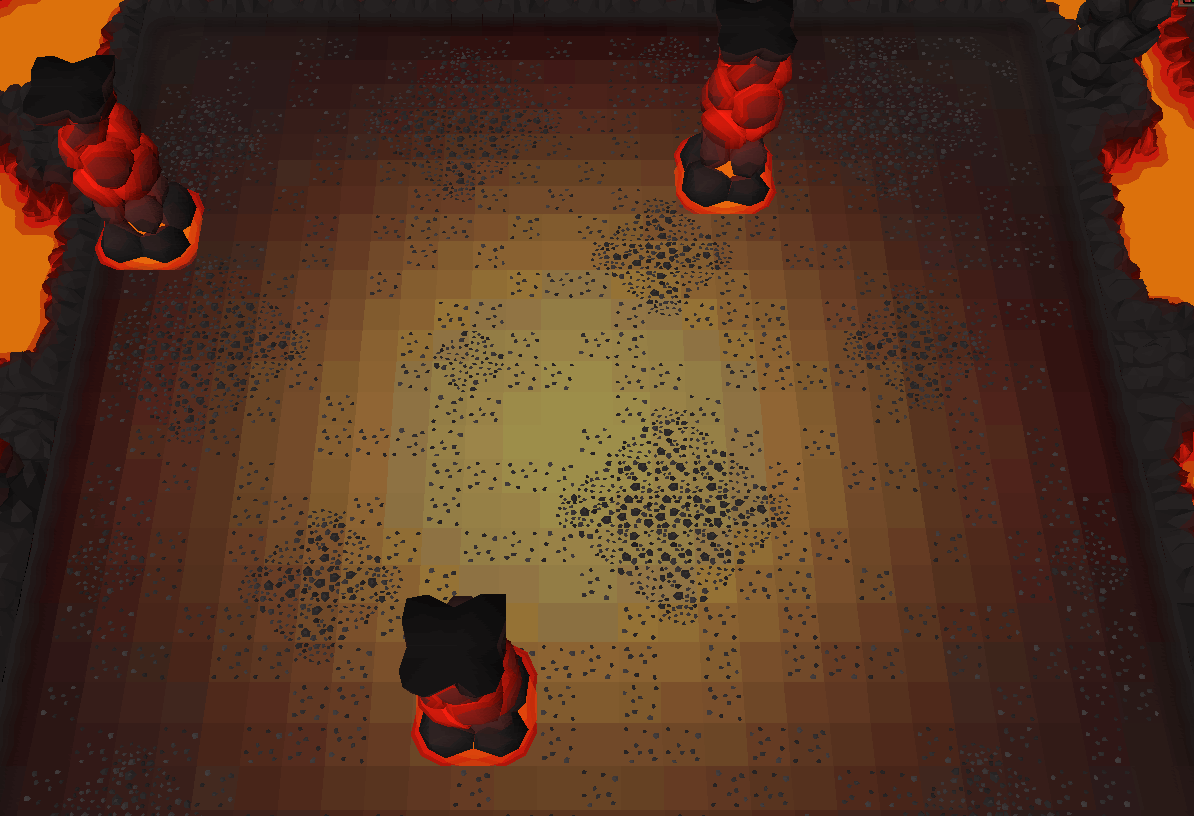
Once you enter the Inferno you will start to the south of 3 large pillars and a wide open floor.
You will experience hell here for 28 waves before you are teleported to fight triple jads then Zuk.
The west (left side) and southern pillars are useless to you. forget they exist. the only one you care about is the north east pillar (right side). This is going to be your safespot and lifeline for a lot of the inferno.
In fact so much so that for some reason the nibblers (reference mob section). cannot destroy this pillar.
Anyway, you will face much like the fight caves waves of mobs there that will spawn in set locations (reference waves section) that you must kill before the next wave can spawn.
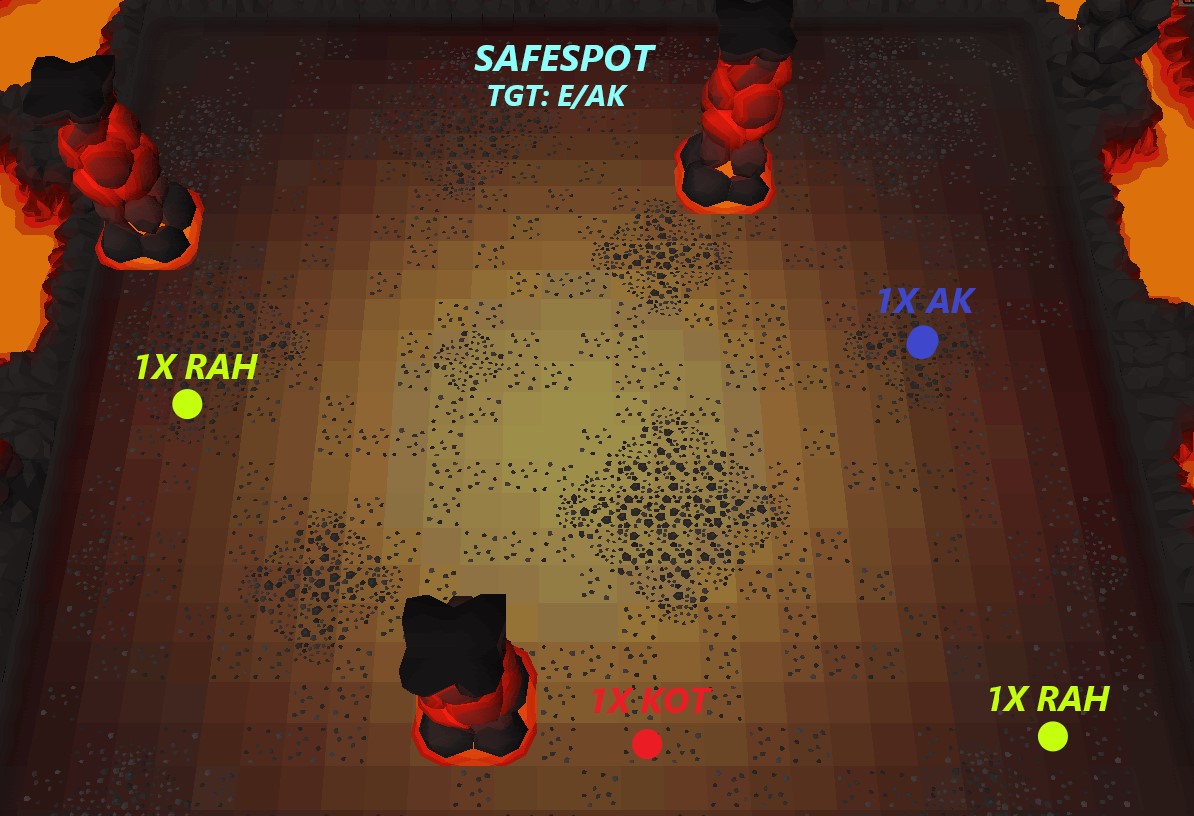
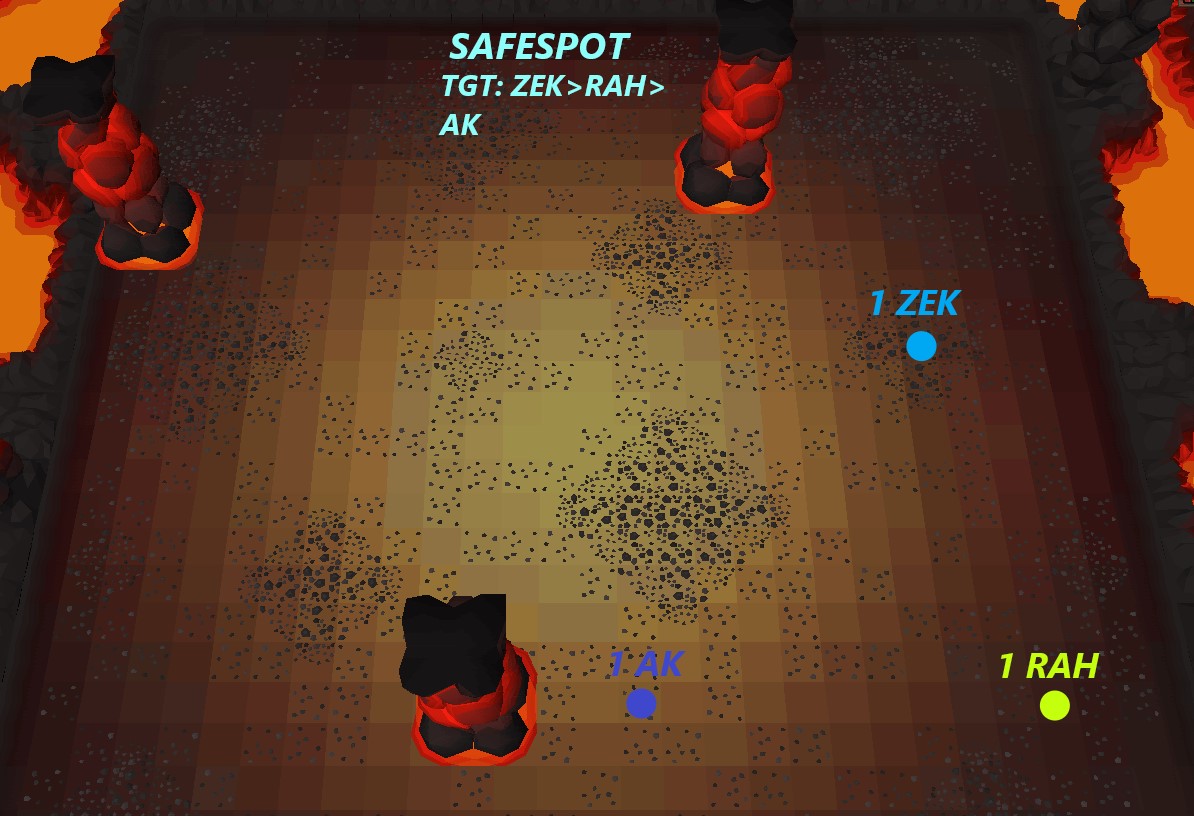
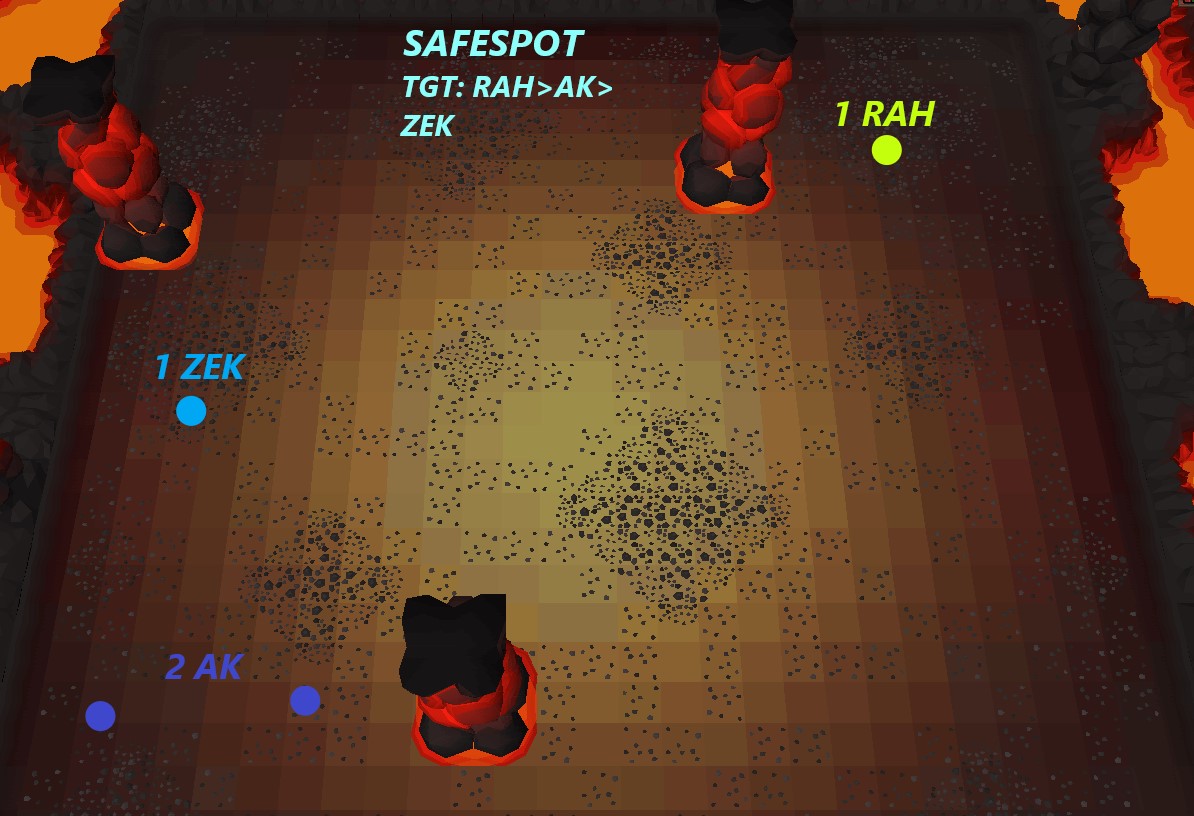
Safespot
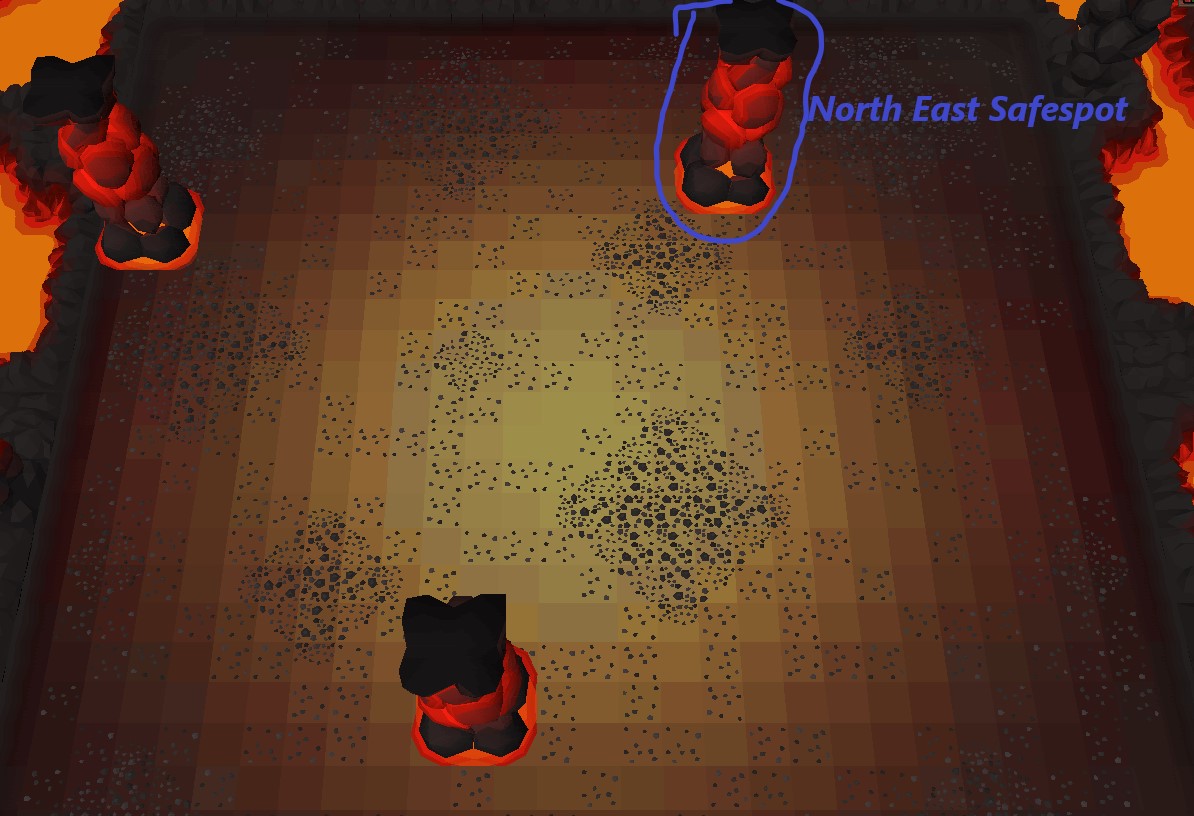
Referencing the above image you can see the safespot pillar. but what does that mean? nothing to you yet. Reference instead the below image:
Looking at this image you will notice my character standing directly in front (north) in the center. This is the OPTIMAL SPOT FOR SAFESPOTTING in the inferno. To get more indepth look at this:
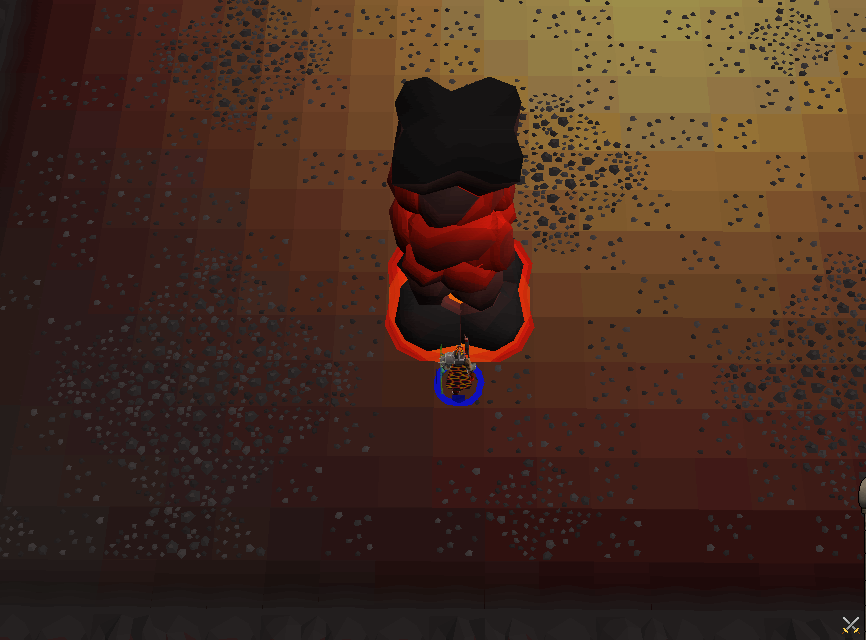
Optimal Safespot (In Depth)
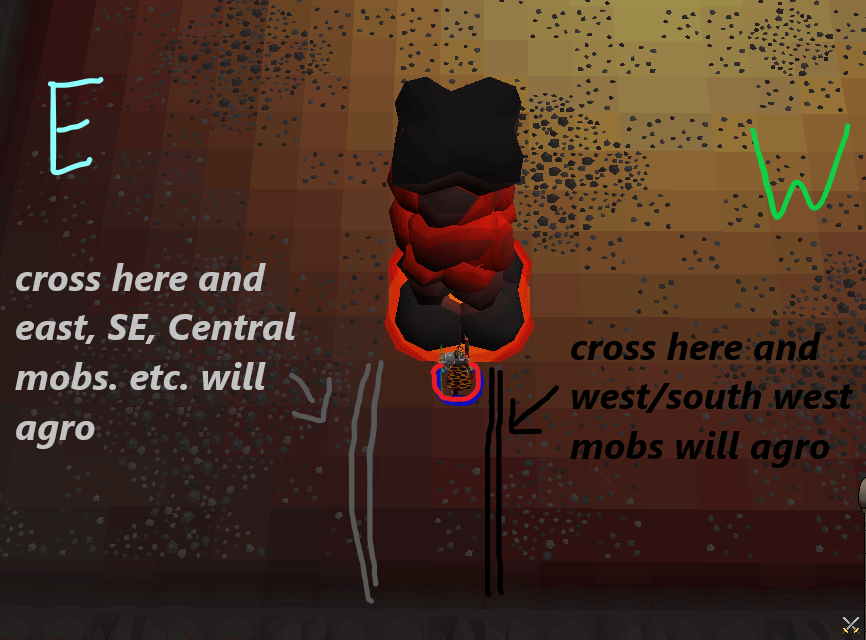
The safespot is very important at certain waves because multiple mobs will spawn and it allows you to pick them off one at a time, or at the very least not have to face-tank 6 different mobs that all attack with different styles. It saves supplies and increases your survivability rate.
As you can see in the photo there are two lines.
The Black (west) line if crossed with agro all the westernmost/southwesternmost mobs. You will PRACTICALLY NEVER EVER cross this line until all eastern mobs have been dealt with.
Repeat... NEVER
The Grey line can be crossed to agro the east/ south east, and central mobs to come and attack you while still keeping the western mobs at bay. This is useful in certain waves though at times you may need to wait for mobs to come to you and stepping over it can be very dangerous. in short, reference my step-by-step waves section and dont be hasty. ill tell you what to do.
Inferno Mobs
Easy enough: a list of all the mobs that you will encounter in the inferno, their color dot (for waves map) and what to Pray for each
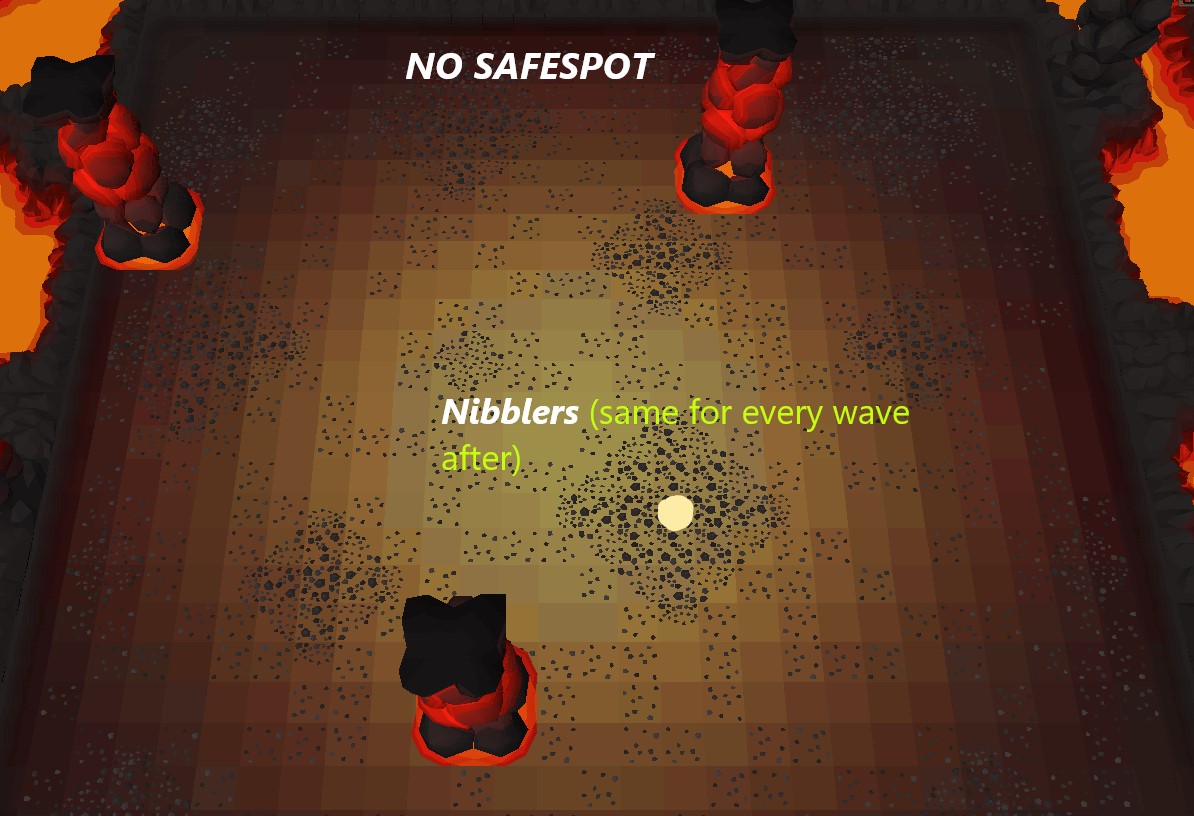
Nibbler

Pray: Nothing
Notes: The Nibbler always comes in threes. Meaning that 3 spawn every wave until you reach triple jad. They are relatively harmless and are the lowest priority to kill. So low that I do not include them outside the first wave for the waves guide. Kill them last and forgot they exist otherwise.
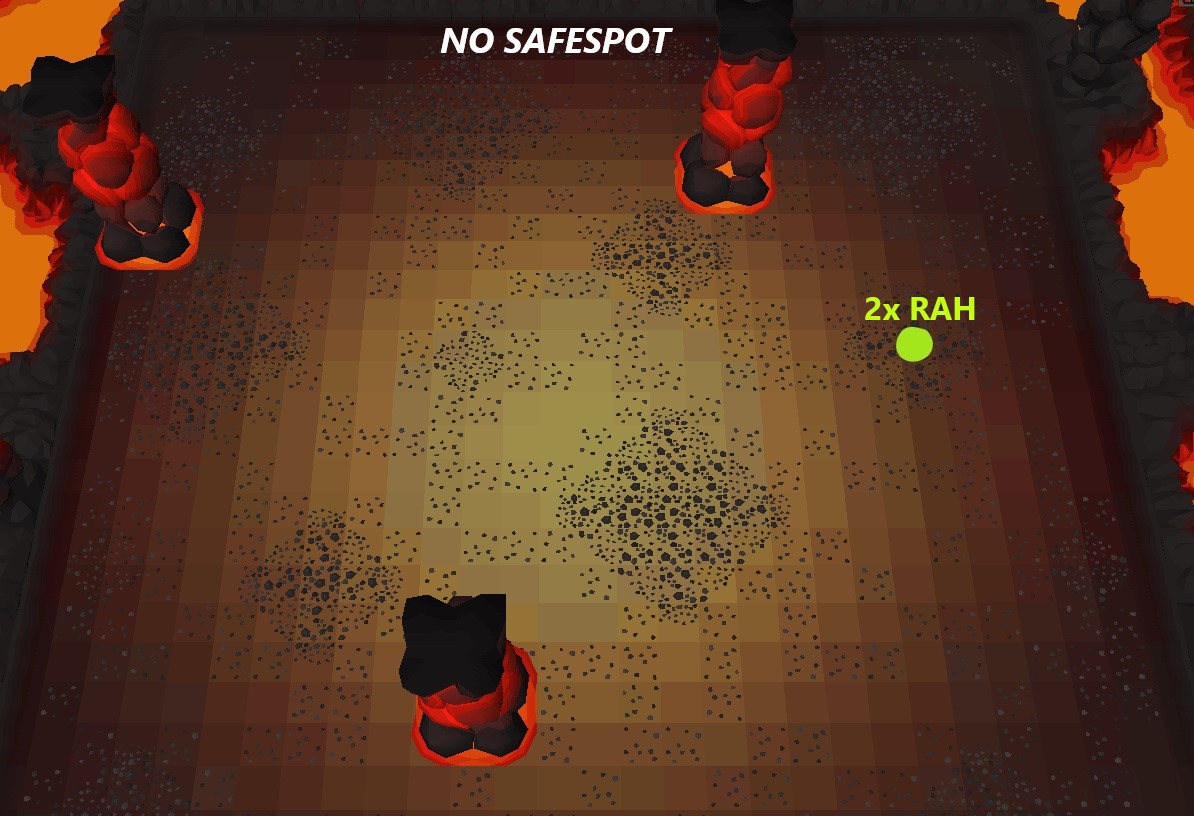
Rah
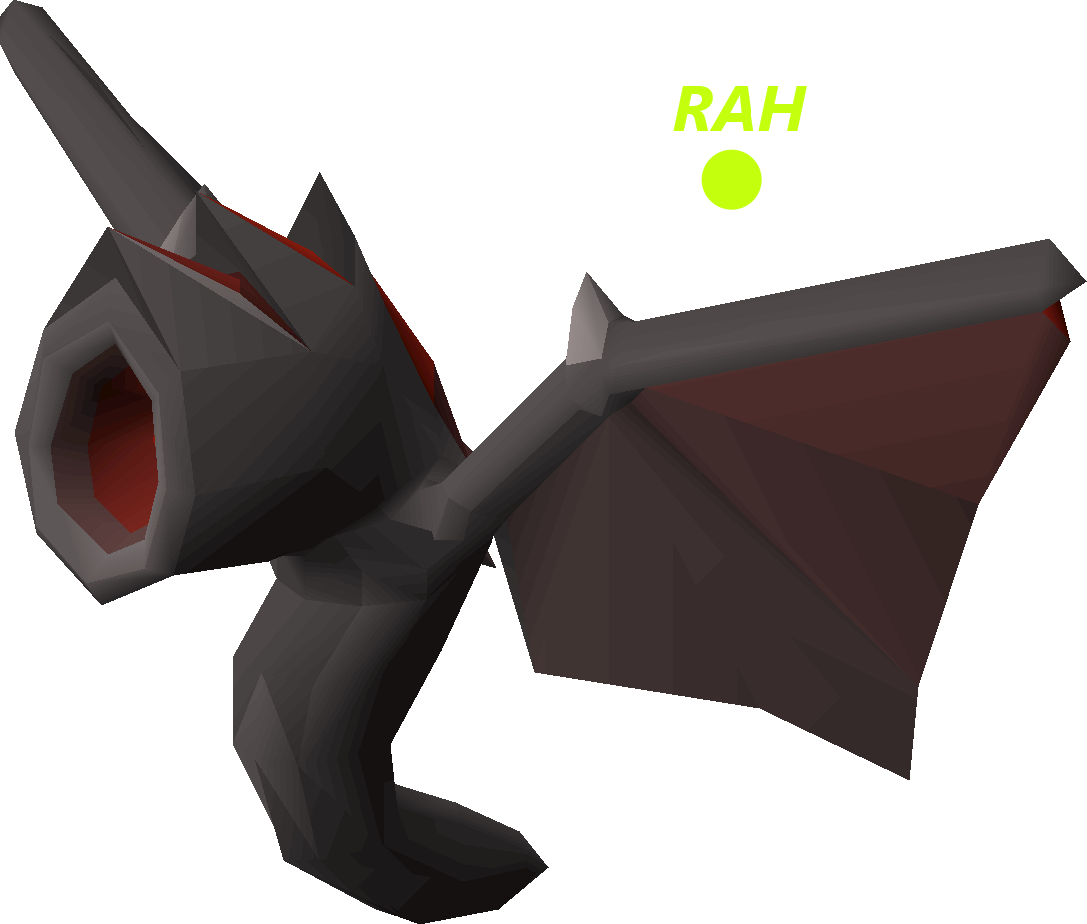
Pray: Range
Notes: Rah is present in almost every wave of the inferno and can hit fairly decent with a slow range attack. You will commonly face multiple and they are a pretty low threat.
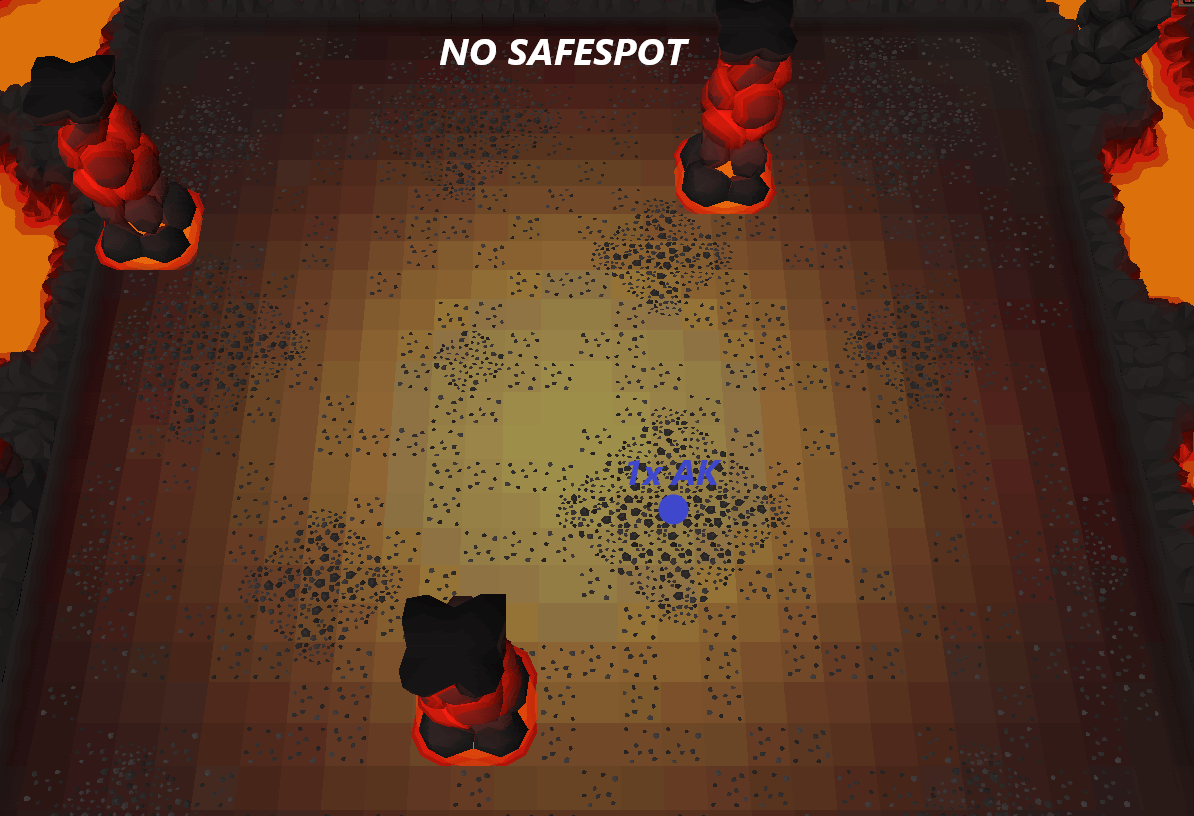
AK

Pray: Mage and Range
Notes: Outside of Triple Jad AK is the most annoying mob in the inferno. It has stupidly complicated mechanics for such a low level creature. If you have a rundown with this though in conjunction with higher level mobs DO NOT FLICK PRAYERS. Use the prayer for whatever the higher level mob is (say a KOT or XIL or ZEK) and quickly kill the AK first to mitigate damage on your persons.
It will attack with either mage or range with whatever style prayer you are currently using. Meaning if you are praying mage it will attack with range and vice versa. The tactic here is you pray range, wait for it's animation to begin and quickly switch to mage and vice versa.
Once it is killed however it will spawn three minions that each attack in a different style. I suggest killing the melee>mage> then range one.
KOT

Pray: Melee
Notes: The Kot is a melee, hard hitting middle of the road mob for the inferno. IT is easy to kill though it can hit VERY VERY Hard. It is recommended if you are fighting this and another mob at the same time (besides XIL or ZEK) that you pray melee.
XIL
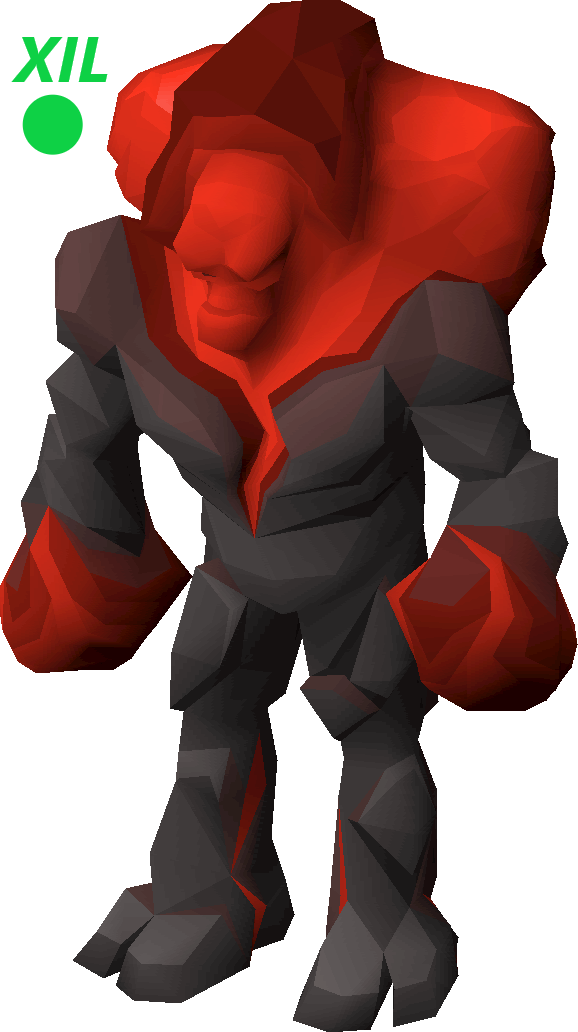
Pray: Range
Notes: XIL is a massive, hard hitting Range mob that you never want to face without Range Prayers on and (luckily) you don't have to (following the waves section). He only attacks with range so pray that and you will never take damage from him.
ZEK
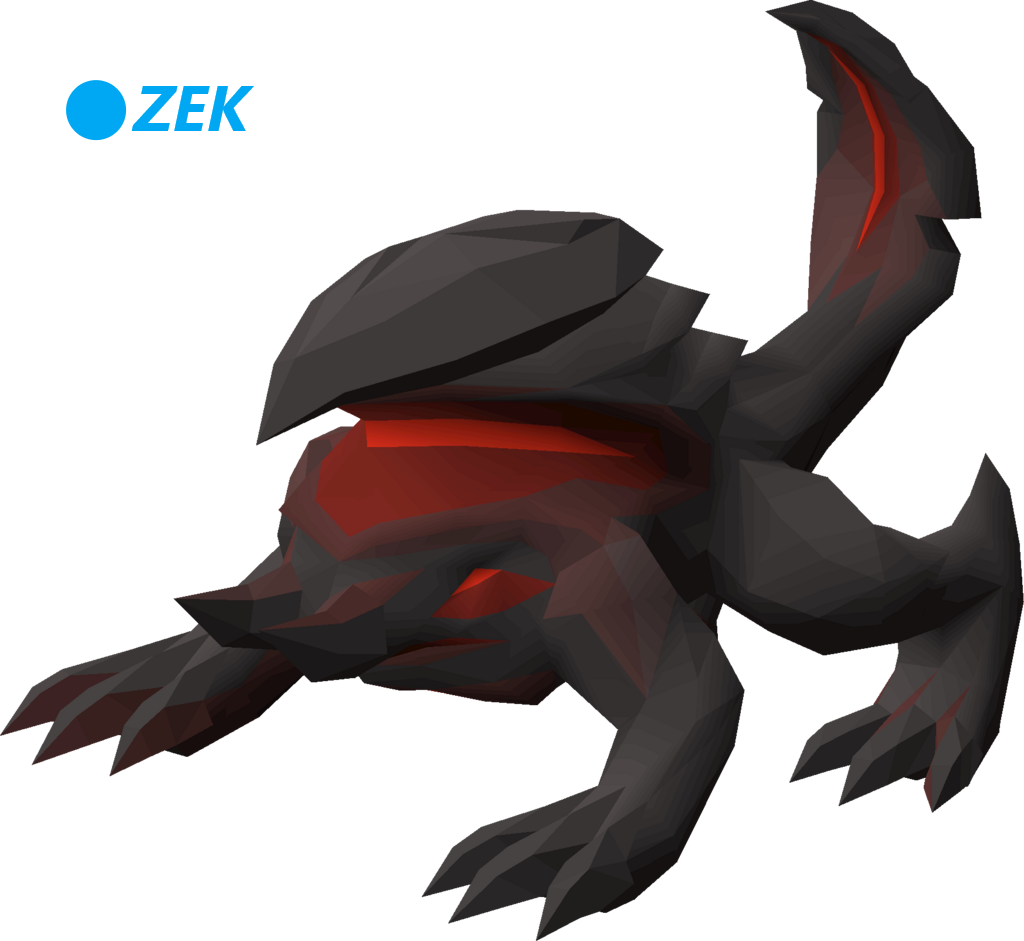
Pray: Mage
Notes: NEVER, EVER Face ZEK without Mage prayer on. That is a deathwish. He only attacks with mage and hits very very hard. he has top priority for prayers over every other mob. if you face multiple and he is among them, pray mage and take out the others fast.
TRIPLE JAD (Explanation + Tips)

Triple Jad are the hardest mobs in the inferno to beat. Period. End of Story.
To do so you will need to understand the mechanics of the single Jad (which hopefully you know from doing the fightcaves but some people don't do it)
To fight Jad you want to Pray Mage or Range depending on how he attacks
Pray Mage if: he hovers in the air and shoots a projectile out of his mouth
Pray Range if: He raises his arms then slams them down really quickly
With Triple jad it is the same principle except you have to fight three at once. They attack one at a time cycling around and around. You have 1-2 seconds to prep between attacks but be ready.
TIPS: Pot up to 99 prayer points on wave 28
Use Divine Ranging pot on wave 28
Set Camera to face North (for uniformity, in case you have to redo inferno makes it easier for next time)
Set AUTO ATTACK ON (so you dont have to click jad to attack, you can focus on pray flicking)
AFTER YOU KILL JAD RUN NORTH TO FACE ZUK (USE POTIONS AGAIN etc. as you do so)
ZUK (explanation + tips)
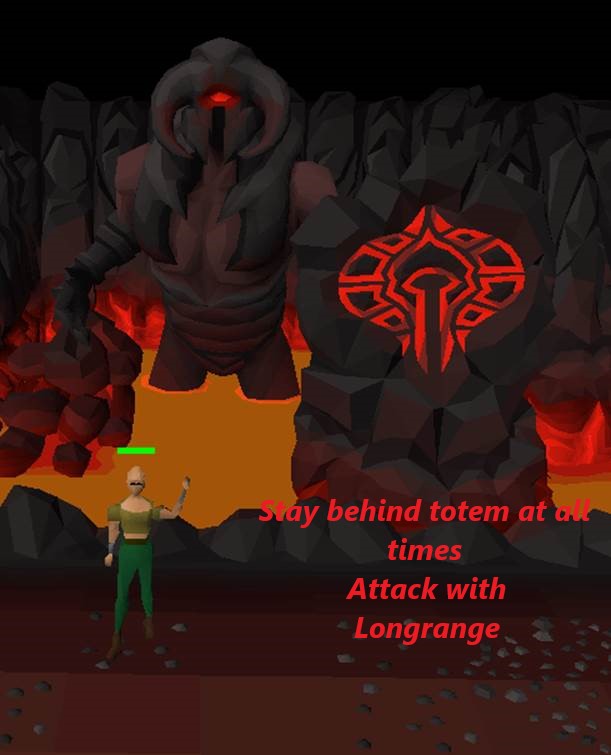
Looking at the image above you notice ZUK in the lava and a large totem thing sticking out of it.
As you run NORTH from Triple jad after killing them you want to stand behind the totem and switch your attack style to long range. The totem will start moving side to side slowly,
ALWAYS MAKE SURE TO KEEP UP WITH IT AND STAY SLIGHTLY AHEAD OR DIRECTLY BEHIND THE TOTEM.
You do not need protection prayers for Zuk though rigour is highly recommended to hit harder and more frequently, and to soak the occasional projectile that may slip through with a mishap.
Without further ado let's break down the waves and get you that infernal cape!!
Wave Breakdowns
KEY
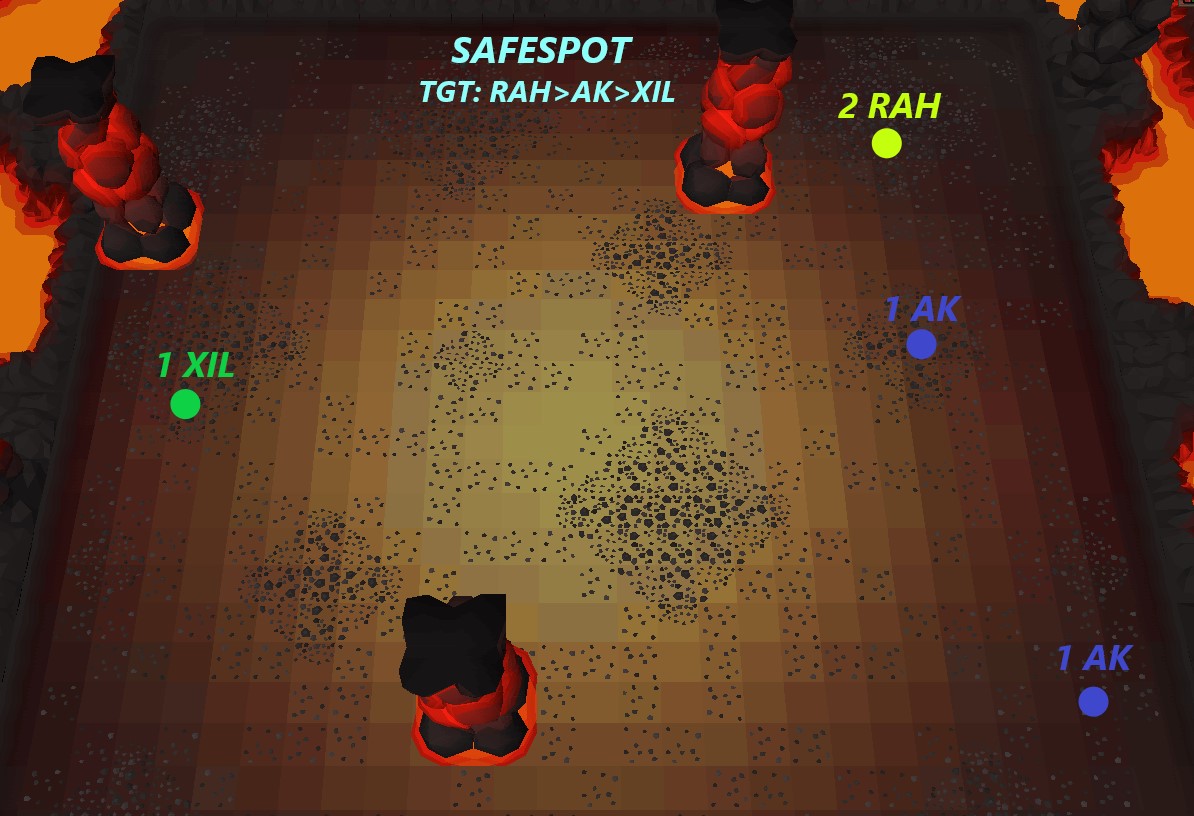
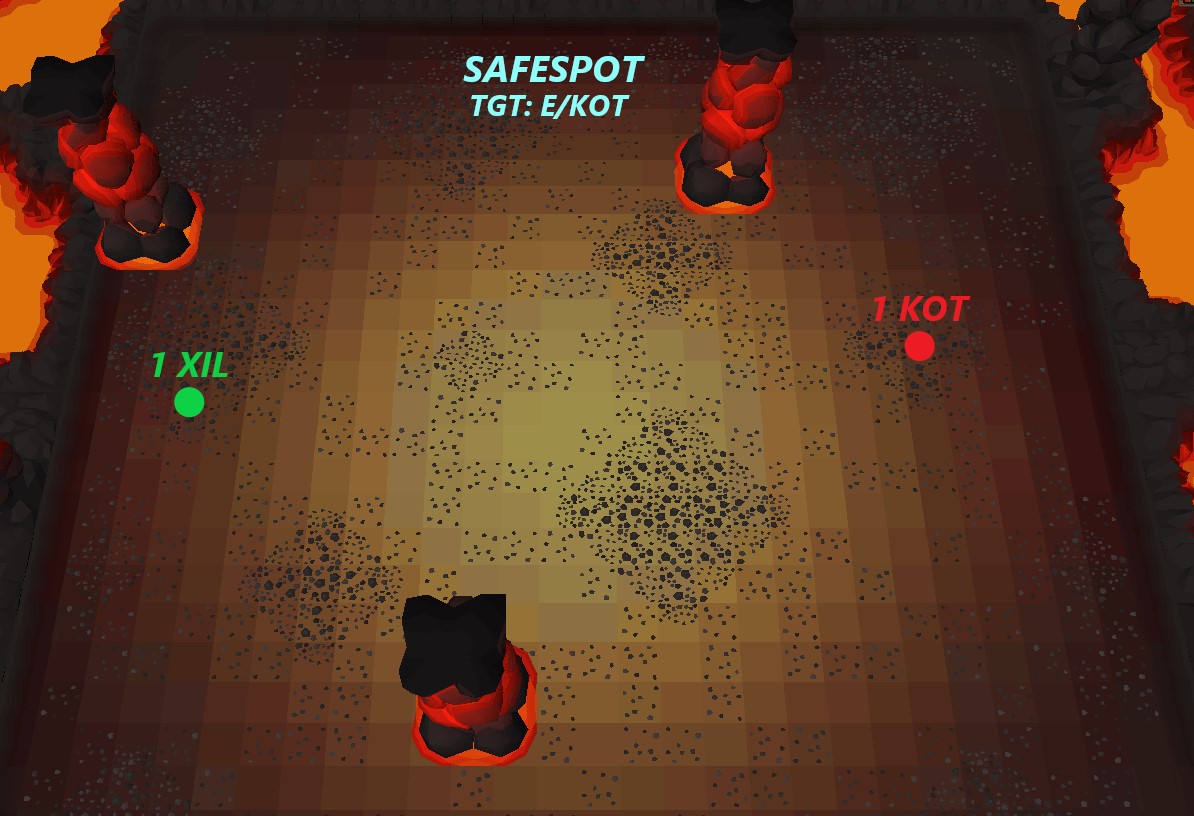
SAFESPOT: USE THE NORTH EAST PILLAR SAFESPOT FOR THAT WAVE
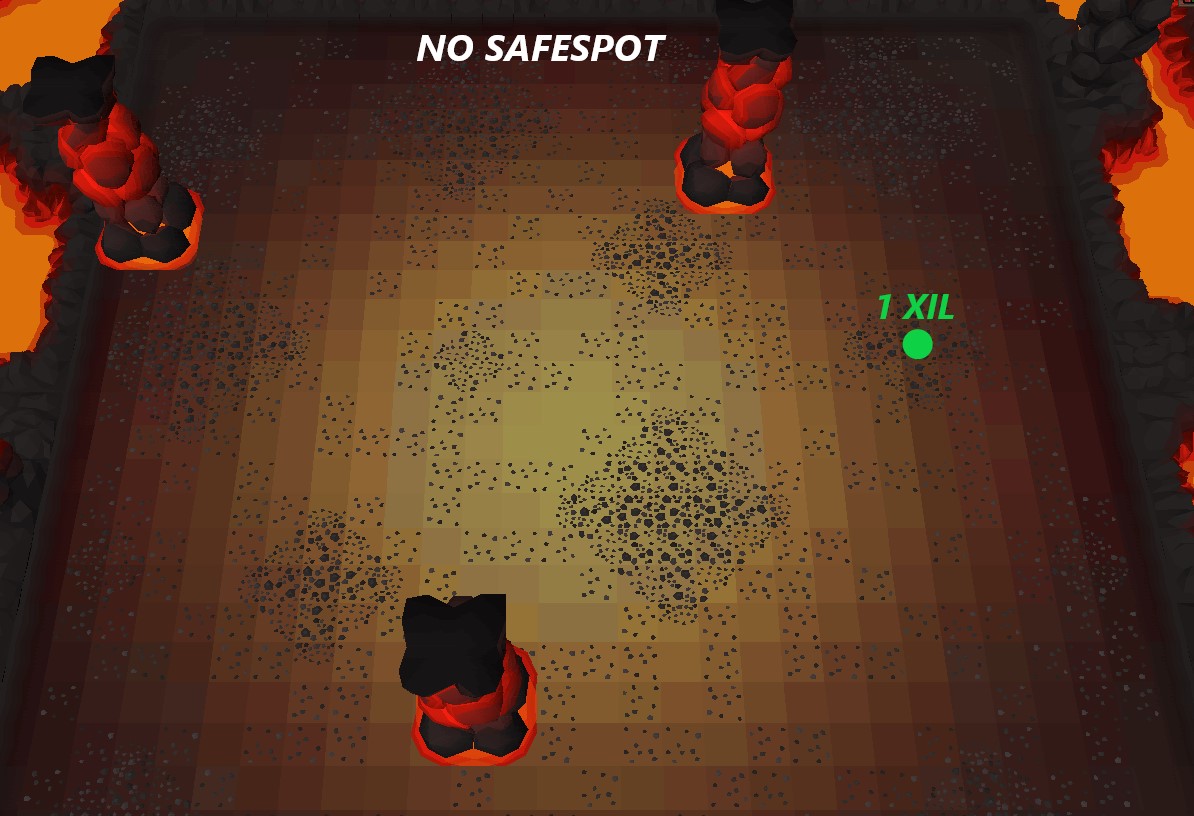
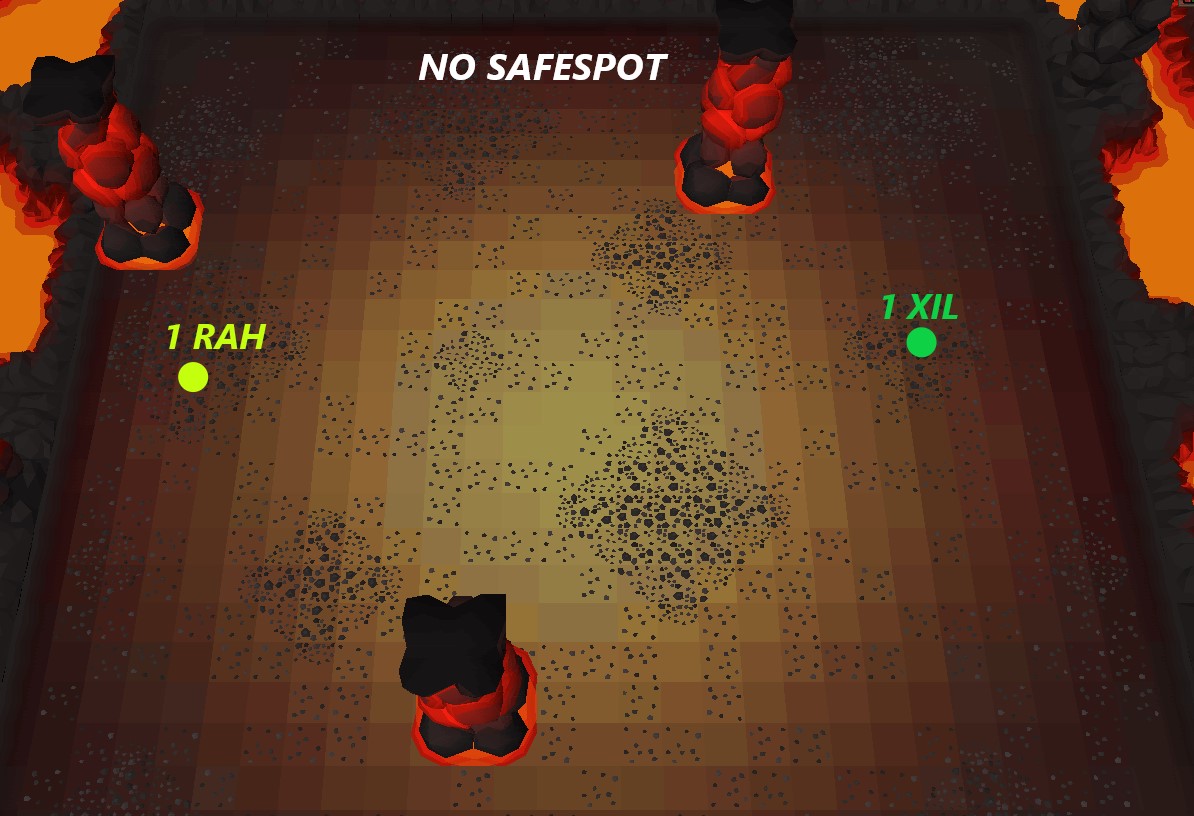
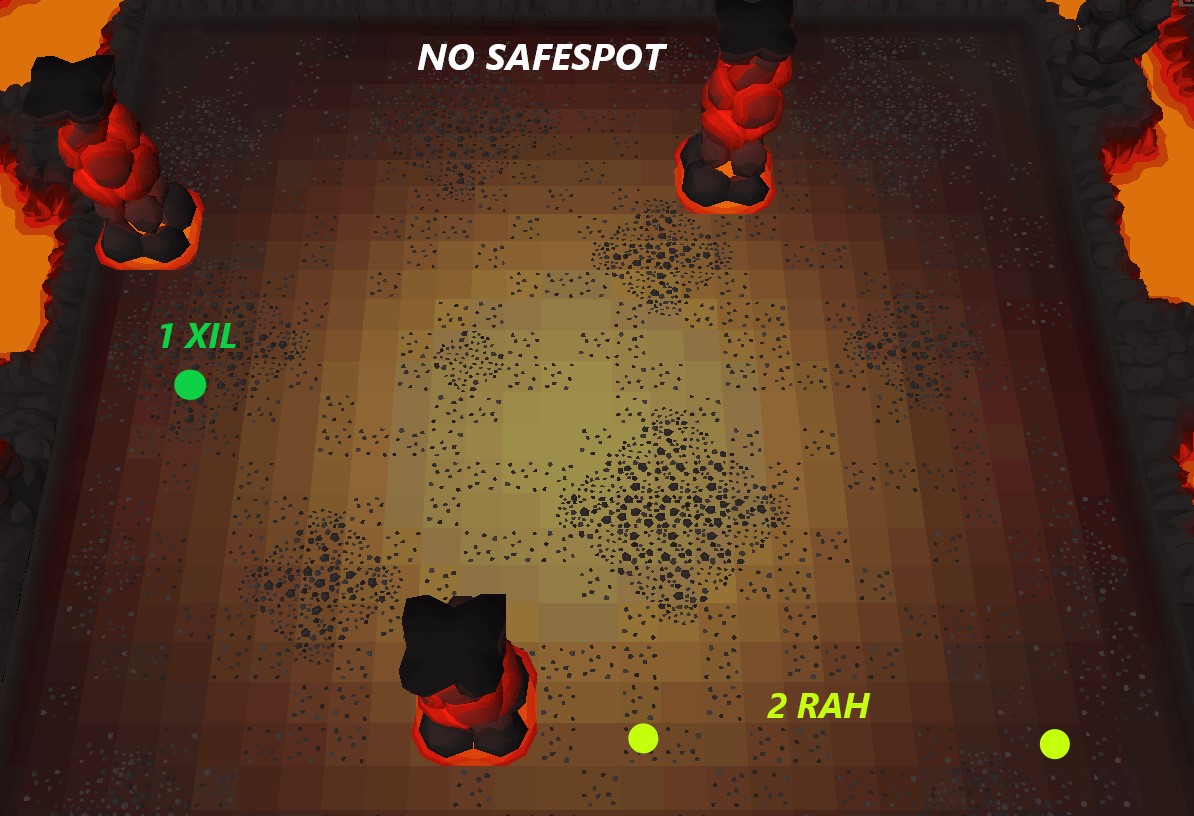
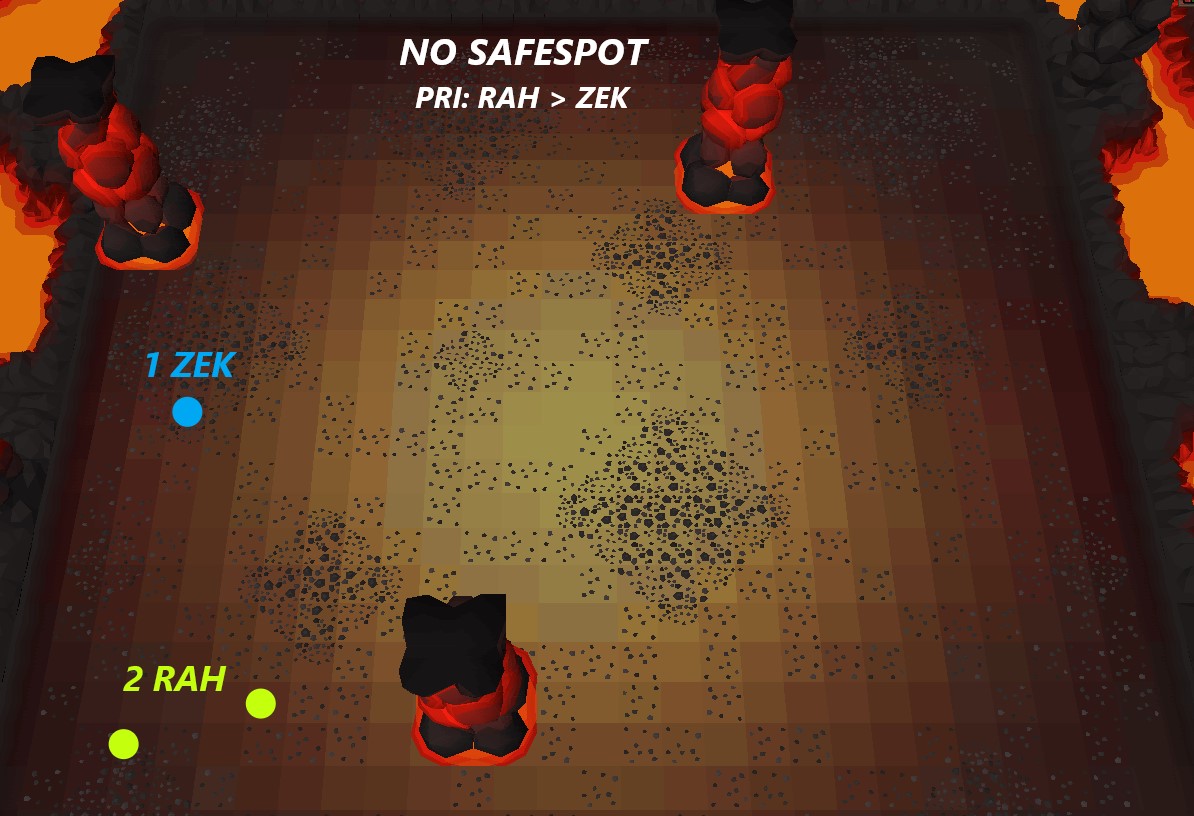
NO SAFESPOT: THERE IS NO NEED TO USE THE SAFESPOT FOR THAT ROUND
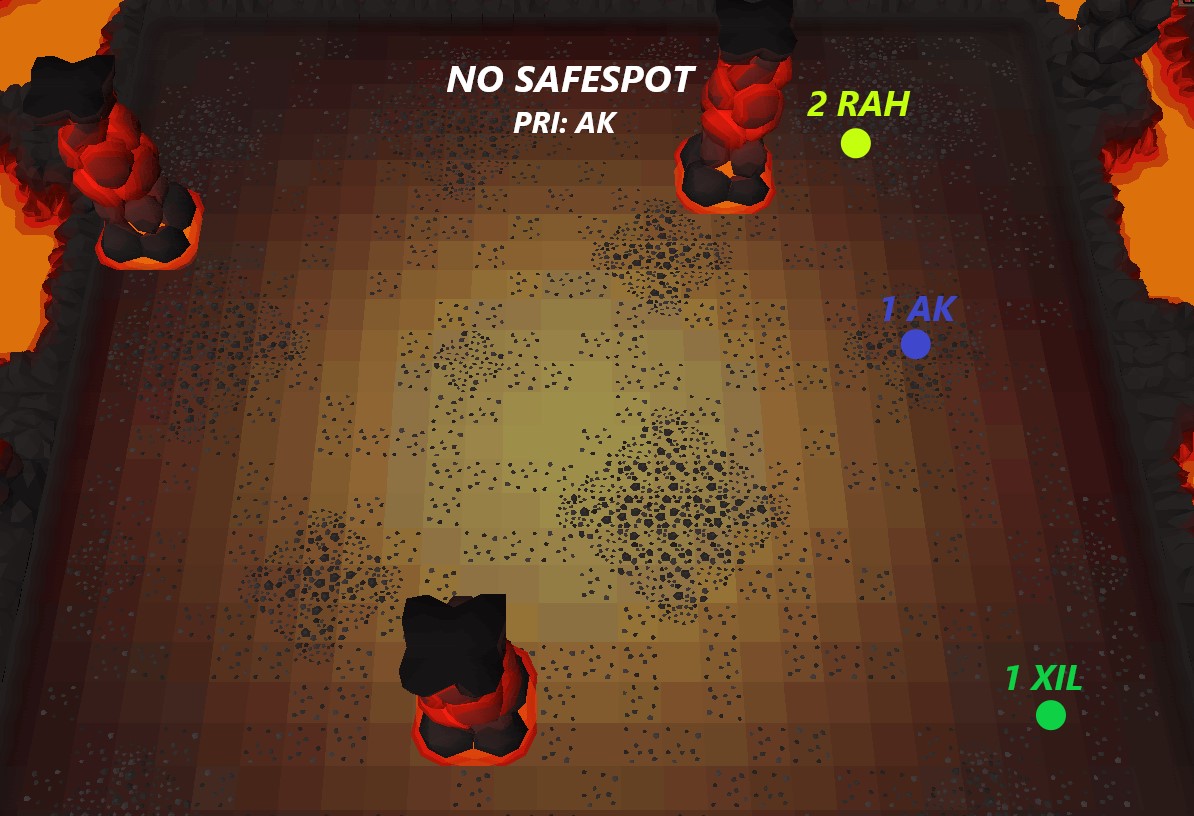
TGT: TARGET THE MOBS SPECIFIED FIRST.(REFERENCE MOB SECTION FOR PRAYERS + PRIORITY PRAYERS) EX: RAH>AK . KILL THE RAH THEN THE AK.
PRI: PRIORITY ORDER FOR KILLING.
N/ E/ S/ W/ ETC.: THE DIRECTION FOR THE SPECIFIC MOB TO FOCUS ON, TARGET ETC.
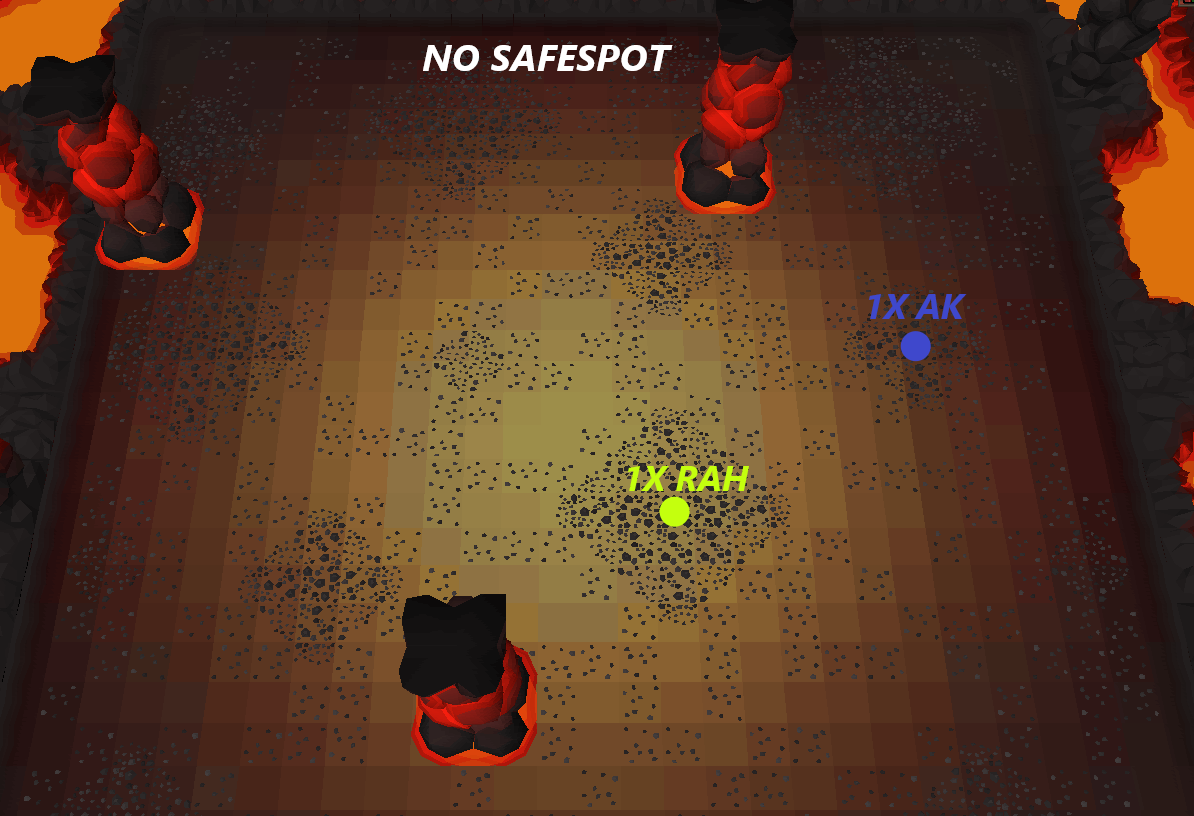
WAVE 1
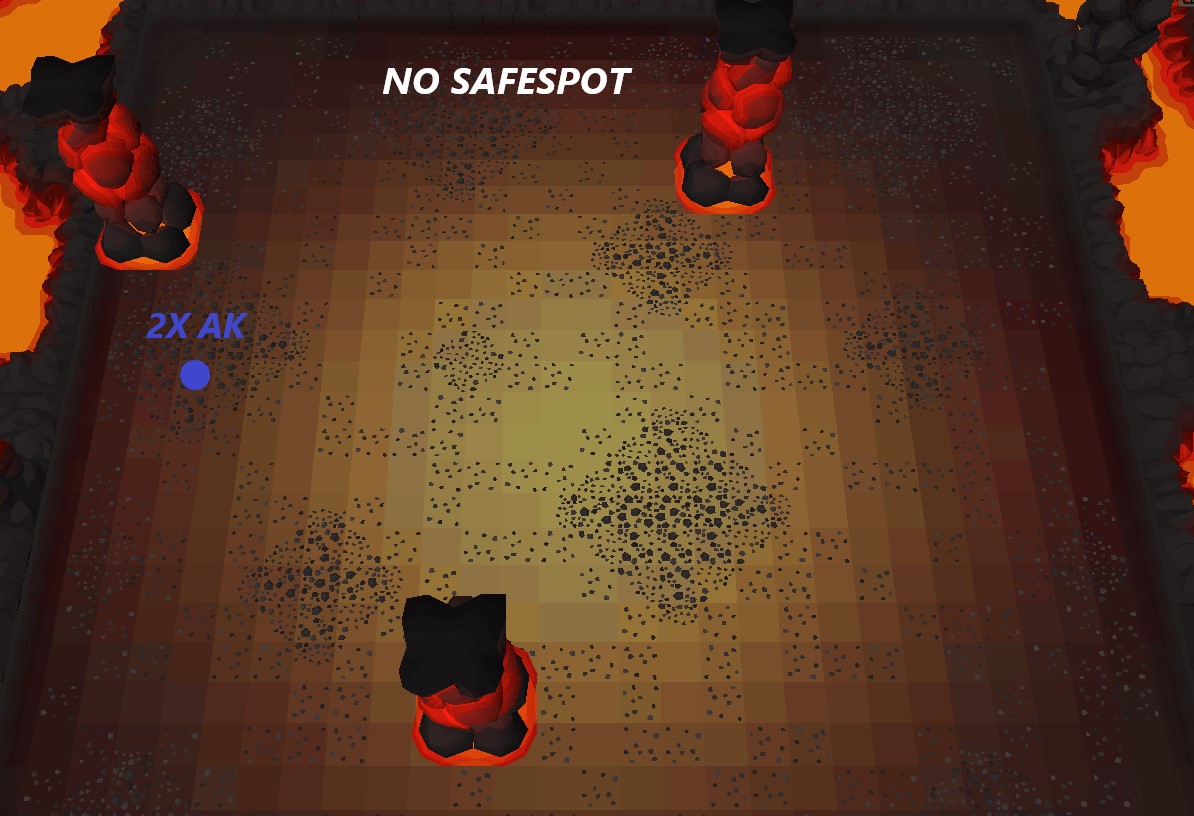
WAVE 2
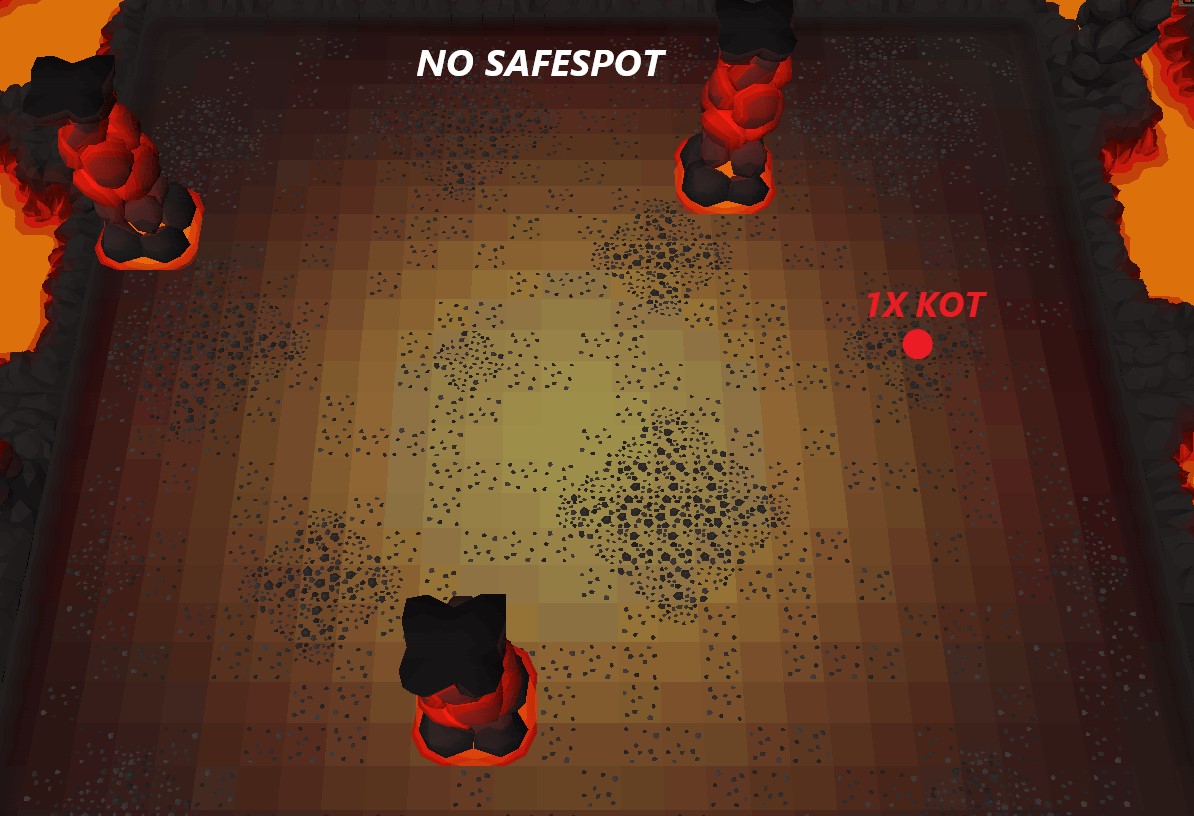
WAVE 3
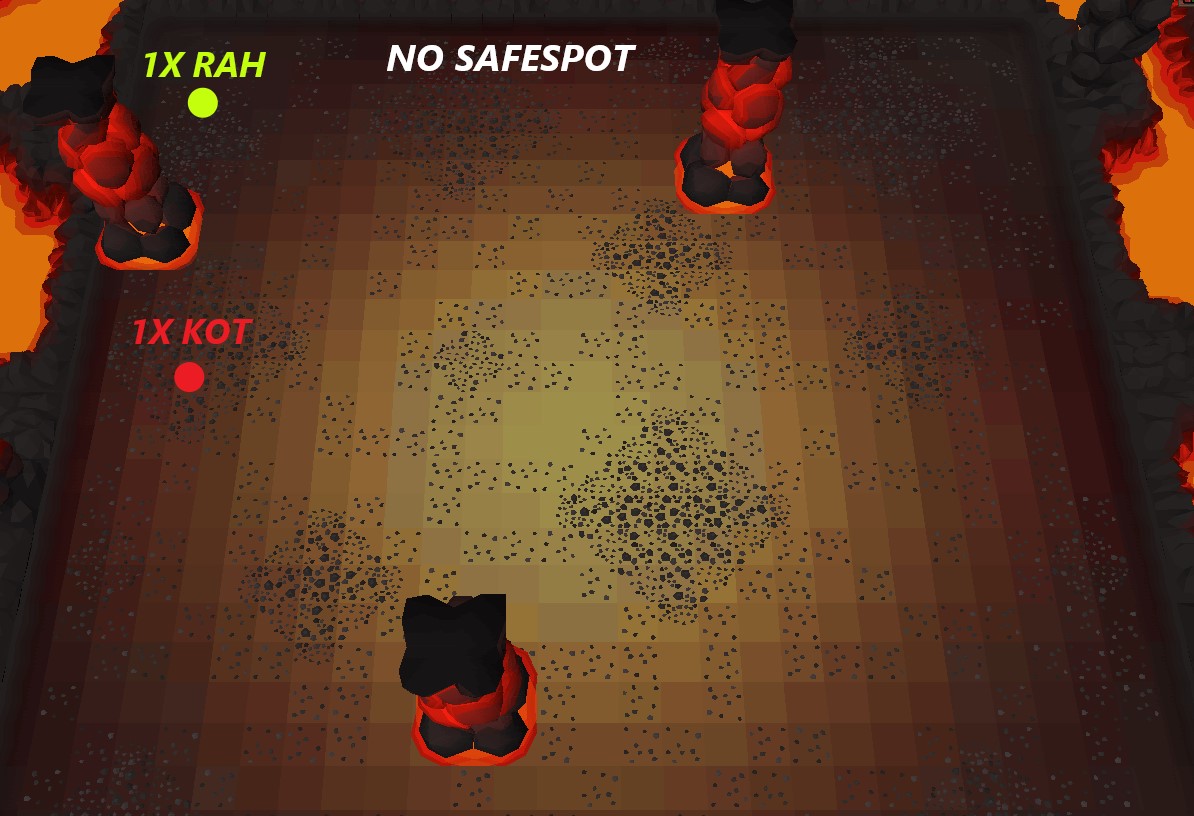
WAVE 4
WAVE 5
WAVE 6

WAVE 7
WAVE 8
WAVE 9

WAVE 10

WAVE 11
WAVE 12
WAVE 13
WAVE 14
WAVE 15
WAVE 16
WAVE 17
WAVE 18

WAVE 19

WAVE 20
WAVE 21
WAVE 22
WAVE 23

WAVE 24

WAVE 25

WAVE 26

WAVE 27

WAVE 28

TRIPLE JAD
REFERENCE JAD IN THE MOBS SECTION FOR MORE DETAIL BUT A BRIEF:
FLICK PRAY BETWEEN RANGE AND MAGE
PRAY MAGE WHEN: HE RAISES UP AND STAYS IN THE AIR
PRAY RANGE WHEN: HE SLAMS DOWN REALLY FAST
JADS WILL ATTACK ONE AT A TIME IN A CIRCULAR PATTERN
RUN NORTH TO ZUK AND STAY BEHIND TOTEM AFTER LAST JAD IS DEAD
ZUK
ONLY STRATEGY YOU NEED:
CONGRATS!!! YOU FINISHED THE INFERNO! (HOPEFULLY) AND HAVE EARNED YOURSELF A SWEET INFERNAL CAPE
No Comments