
Chambers of Xeric Guide
Chambers of Xeric In depth Guide
Introduction
For many players the endgame is to acquire the best gear, complete collection logs, and conquer the entirety of PVM. In order to reach this goal however, you will at some point have to take on the challenge that is the Chambers of Xeric. Whether it be to acquire the fabled Twisted Bow or to make a profit, you will find plenty of challenge within. Let's get started learning how to deal with this terrifying dungeon!
Note: To see Drop tables and rates for Raids, reference the section below for specifics.
What is a Raid?
A Raid is a team-based minigame in which players can either join together, or go solo, to conquer multiple bosses before finally killing one massive boss to obtain rare loot.
Requirements
Before we delve in any further I think it's best that I share some requirements that I believe to be essential before truly grinding out raids. You can obviously do them with less stats or worse gear; however, doing so would not be efficient and you would be before off getting those levels or the gear beforehand. Furthermore, I play a UIM and so this will be a guide centered on both regular players and Ironman alike. I will not be focusing on how to attain the gear mentioned, nor the skills, look at other guides or ask help in game on how to reach those levels/get that gear.
Stats:
Attack: 85+
Strength: 85+
Defence: 85+
Prayer: 74+ (For Rigour)
Magic: 90+
Range: 90+
(Ironman) Herblore: 38 (prayer pots) or 63 (super restores)
(Ironman) Cooking: 80+ (for Sharks or better food)
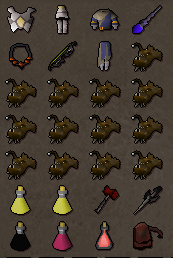
Gear/Inventory Setup:
The following gear recommendations are included for you to look over and see what players typically use. As far as first getting into raids it is understood that you will not have a Twisted Bow or a Scythe of Vitur (usually) and as such a Toxic Blowpipe is the BARE MINIMUM for Raids. You can use it for just about every boss including Olm (reference individual boss guides below for specifics). Furthermore, for any fights that you may need to use melee for, and you dont have a Scythe, bring your best melee setup that you have at the time.
Also NOTE: Serpentine helm, Magma Helm, or Tanzanite helm are HIGHLY RECOMMENDED. These mitigate a lot of damage from various monsters poison and venom attacks. If you do not have one, bring an a few anti-venom potions or an anti-venom+ potion.
Side note: While doing a solo run in the minimum setup is possible, it is highly recommended to get a better setup before you start doing raids if you're trying it solo without much experience.
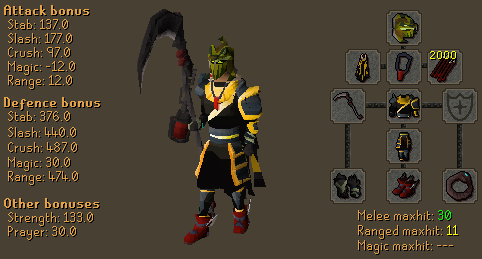
RANGE (Low / Medium)
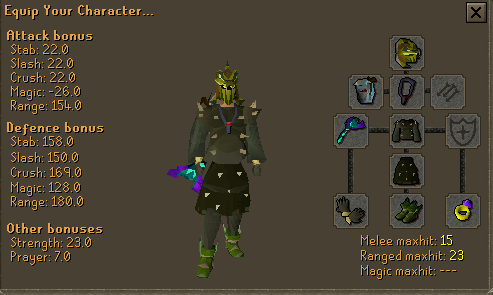
RANGE (Medium / Olm Fight)

RANGE (High Level)
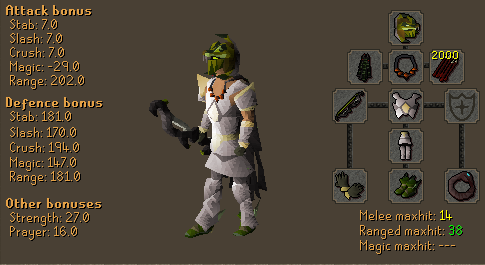
RANGE (Max)
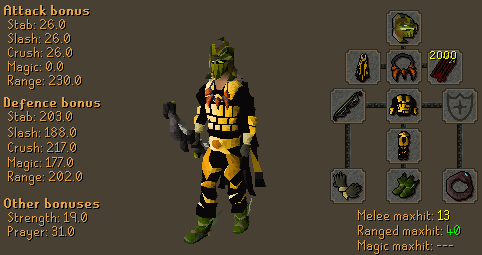
MELEE (Low)

MELEE (Medium)
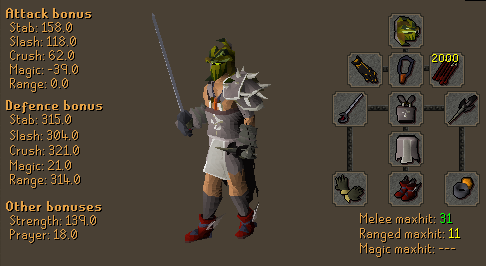
MELEE (High Level)
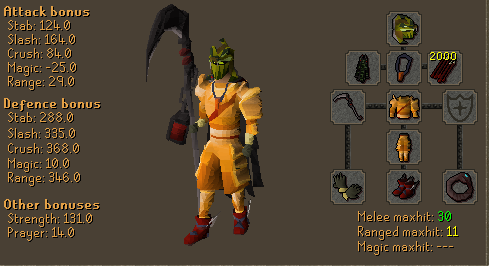
MELEE (Max)
INVENTORY SETUP EXAMPLE (For high level):
Note: A Dragon/Statius's Warhammer is recommended when running a large group or hardcore raid in order to lower the defense of some bosses (Tekton, Muttadile, Guardians, etc.). However, this is not required in a regular solo raid as most bosses are relatively weak.
INVENTORY SETUP EXAMPLE (Budget setup):
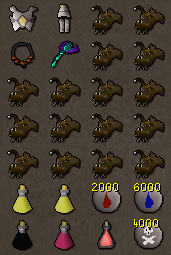
You will want to have:
A range/melee/mage switch
Prayer potions/Super restores
Decent Food
Double Damage pot (not needed but recommended, especially for beginners)
Runes for barrage spell (Ice barrage runes shown in photo). Use a Rune pouch if you have one!
Optional: Antidote/Antivenom potions, mage gear (Not necessarily required as few npcs require mage and the ones that do are already weak to it).
It is not required to bring barrage runes, you can also bring a Sang Staff / Trident / Iban's Staff to save inventory slots. It is highly recommended to bring some offensive mage option as some of the npcs (Vanguards) can only be damaged by mage attacks.
Your First Raid
GREAT! You have your stats, your gear, and your inventory all set up. Next, you will want to know some basic info before you start your first raid.
Firstly, When you raid you will fight 5 rooms of enemies/bosses before a final fight that will always be OLM. After you beat Olm you'll receive loot, then you are finished with that raid. You can do the Chambers of Xeric solo or with a team. When you are with a team, the monsters HP scale with the amount of people that were inside the waiting room when the raid was started. For every player, boss hitpoints increases by 100% and their stats increase a bit as well. The monsters also have a chance to hit everyone in the raid instead of 1 player. There is no limit on how many players can join a raid at the same time.
Solo raids have a higher INDIVIDUAL CHANCE of an item (meaning you get it yourself rather than someone else)
Team raids have a higher LIKELIHOOD OVERALL for there to be an item drop amongst you and your team members. Not that you will get the item, it may be your teammate of course.
With that in mind decide on whether you want to be in a team or solo, then you can start.
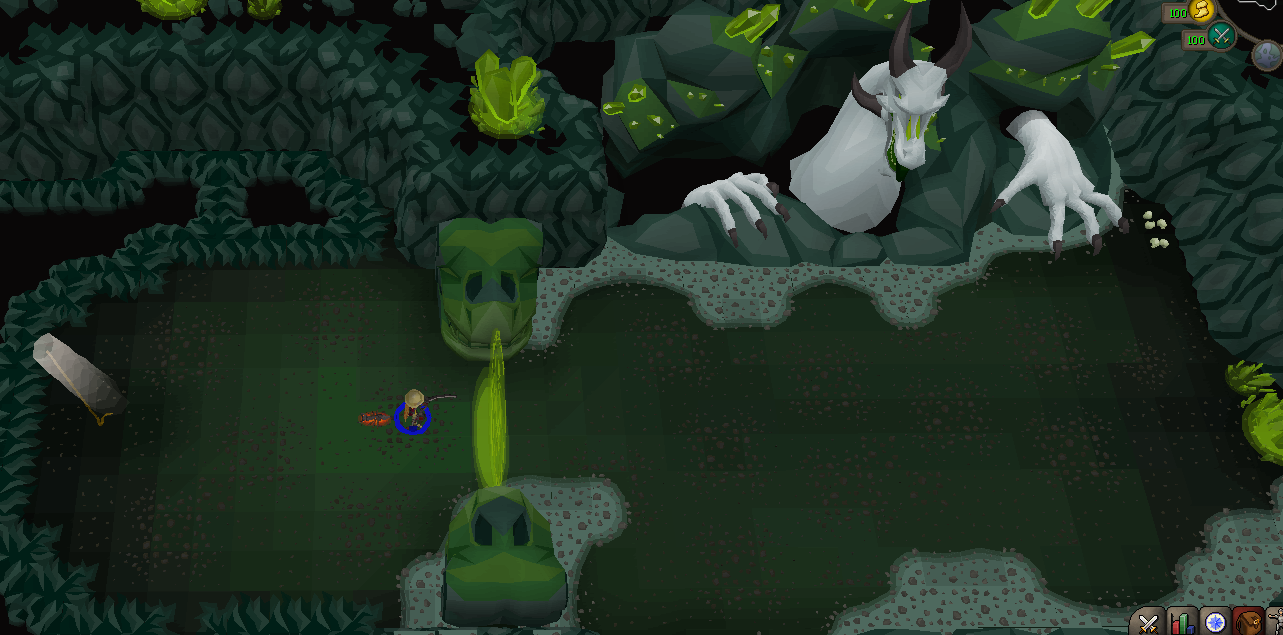
Getting There:
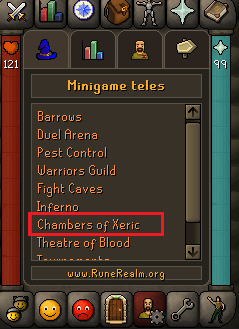
Head to your minigames tele in the RuneRealm tele tab, and use the teleport that says Chambers of Xeric which will take you straight to the entrance of the Chambers of Xeric. You may also use the ::cox command in chat to teleport.

PICTURED ABOVE: Entrance Gate to the Chambers of Xeric (click to enter or right click and Quick-solo to start a solo raid)
If you left-click enter the doors you will start a raid on behalf of the Clan Chat you're in.
Side note: You can not enter a raid on behalf of the main 'Help' cc unless you have a certain rank. These ranks are usually only given out to veteran players and staff members. If you wish to do a solo raid without leaving the cc, you can start a raid by right-clicking the door and click Quick-solo, if you wish to do a group session you can (temporarily) leave the help cc and join another one. Staff and veterans regularly organize group raids.
Inside Your First Raid
Once inside you will enter a small "Lobby" area that looks like this:
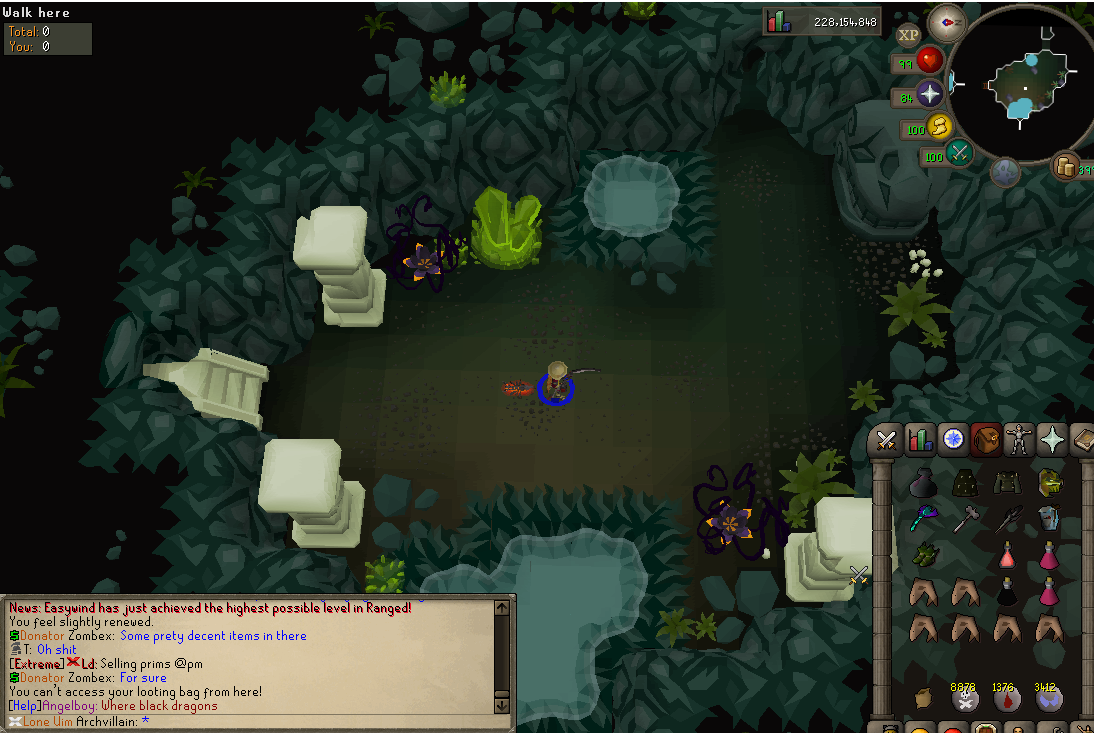
You will see the stairs you entered from, and to the north-west a doorway that will take you to your first encounter.
REMEMBER: Once you click the doorway the raid starts, at this point no one can enter the lobby anymore, and the only way out is to LOGOUT or TELEPORT, which will force you outside the raid and you will lose all of your progress and have to restart. So be ready to fight to the end before you enter. If you die inside the Chambers of Xeric, you will respawn at the start of the room you've died at. You can die unlimited times in raids and you can try over and over again, however every time you die your points are halved.
Before you dive in though we need to cover each room and give a rundown of each Boss/Monster/Monsters and how to beat each one.
Raid Encounters (In Depth)
The following are the possible encounters you may run into before fighting Olm. There will ALWAYS be 5 and then Olm, and they are completely random. You can never have the same encounter twice per raid.
Vespula
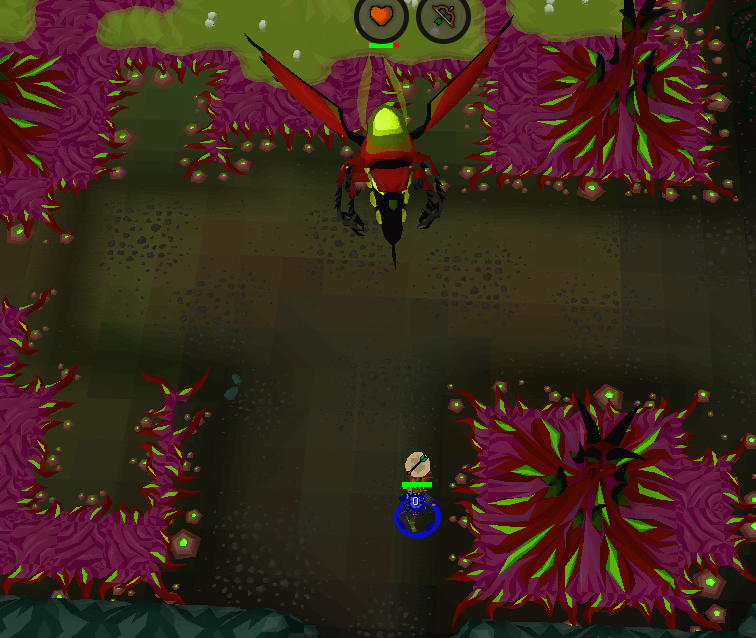
HP: 400
Points per Kill (Solo): 1200
Pray: Ranged
Attack it with: Range
Notes: Vespula is a relatively easy Boss. You can only attack it with Range or Magic (range obviously recommended). Pray range here or you will take heavy damage. Also avoid getting too close or it will attack with melee as well and hit really hard. Vespula can venom you if you don't wear a Serpentine helm or use any other form of Anti-Venom. Upon death, Vespula has a chance to drop a pet (reference the drop table guide for your DR%)
Tekton

HP: 500
Points per Kill (Solo): 1500
Pray: Melee
Attack it with: Melee
Notes: Tekton is one of the slower bosses to kill in the Raid, though if you pray melee he will do 0 damage to you, so it is relatively safe. You will want to attack with your best melee setup. For hardcore raids, it is HIGHLY RECOMMENDED to use a Statius's Warhammer or Dragon Warhammer Special attack to reduce his defence. Even though he has a very high defense, crush weapons should work best against Tekton. Similar to other raids bosses, it also drops a pet (reference the drop table guide for your DR%)
Muttadile
HP: 350
Points per Kill (Solo): 1050
Pray: Magic (if using range) or Melee (if using melee)
Attack it with: Range or Melee
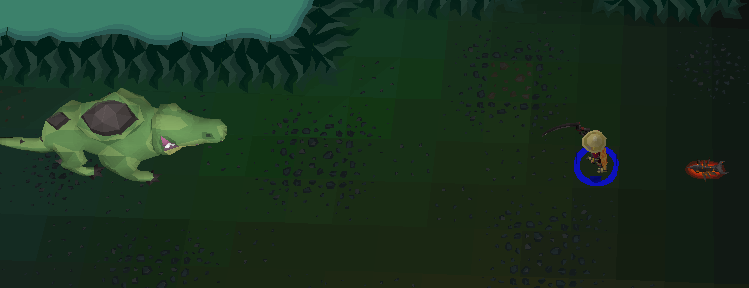
Notes: Muttadile is a fairly straightforward boss to kill, though it can hit through prayer, and if you are using melee to attack it will use both magic and melee attacks against you. It is not recommended to use melee against it until you have a Scythe of Vitur, since it has a very high damage melee attack. The most efficient way to kill Muttadile is with ranged from a distance. Similar to other raids bosses, it may also drop a pet (reference the drop table guide for your DR%)
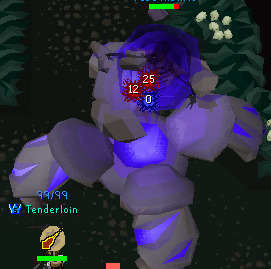
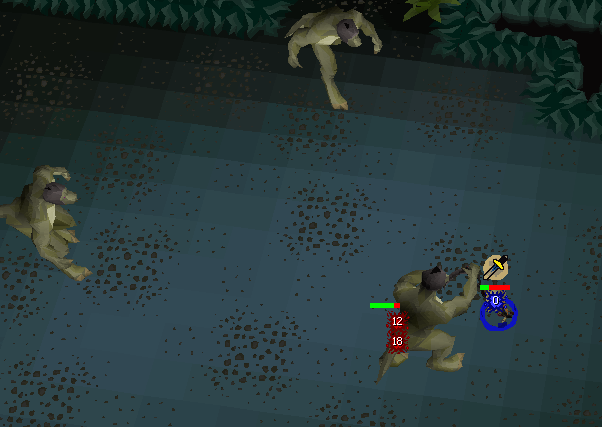
Vasa Nistirio

HP: 600
Points per Kill (Solo): 1800
Pray: Magic (and ranged if prayer switching)
Attack it with: Range or Melee
Notes: Vasa Nistirio attacks with hard hitting magic (two blue projectiles) and range (gray ball) and can hit decently even through prayer and high magic defence armor. It has high HP therefore you may find yourself eating food here, so keep an eye on your HP bar. It is not recommended to use Melee against him until you have a Scythe of Vitur. Similar to other raids bosses, it also drops a pet (reference the drop table guide for your DR%).
When entering the room, Vasa will start off by attacking you with a ranged attack. During the fight, you may also prayer switch to protect between mage and ranged. For the mage attack, Vasa will launch two blue orbs at you. For the ranged attack, it will launch a gray sphere-shaped projectile. The attack animations for mage and ranged are as follows:
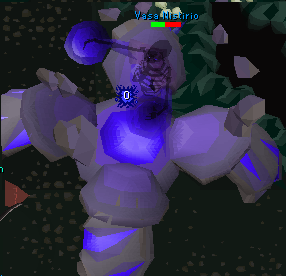
Mage Attack Ranged Attack
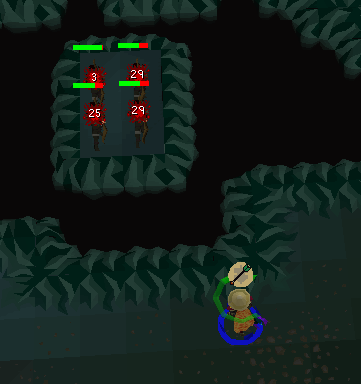
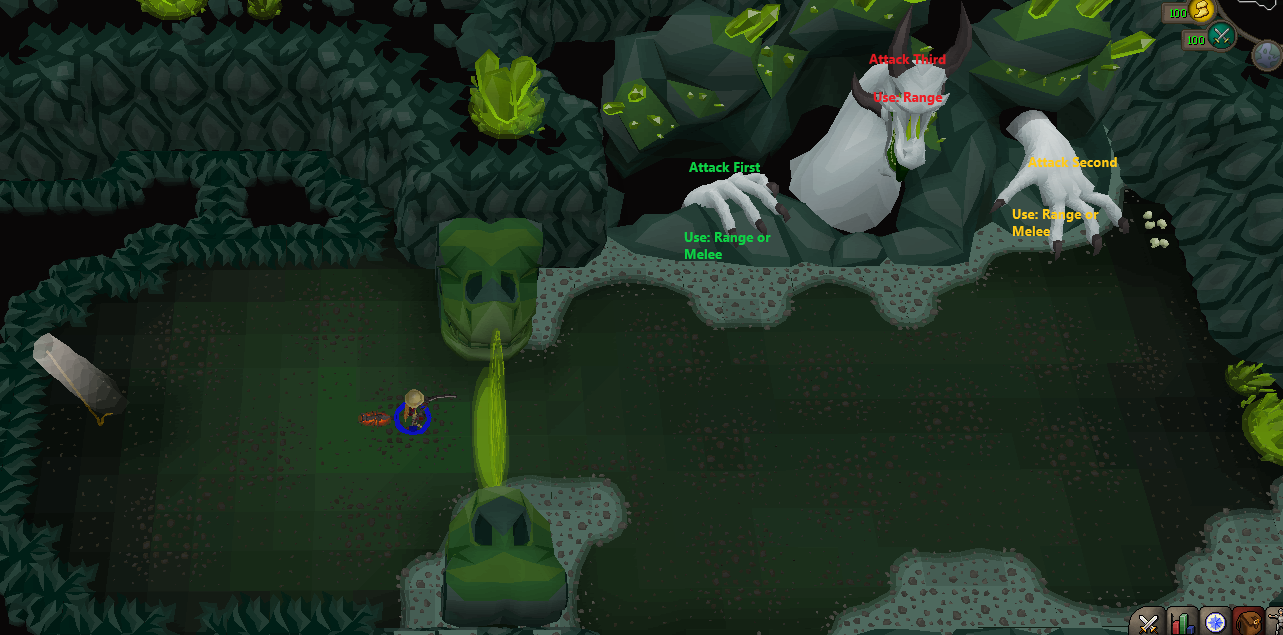
Vanguards
Amount: 3
HP: 200 (600 total)
Points per Kill (Solo): 600 (1800 total)
Pray: Reference Image
Attack it with: Reference Image
Notes: This is one of the trickier rooms that gives new players trouble. Here you will both pray all three attack styles, and attack with all three attack styles. Start by attacking the Pray: Mage, then the Pray: Range, and finally the Pray: Melee. Try not to attract more than one at a time, hence the order I stated will help you to mitigate that. If you attack with the wrong attack style it heals the Vanguards. Use the attack style I referenced on the image and you will easily get through this encounter. Again these drop a pet, reference the drop viewer for your DR%.
Lizardman Shamans
Amount: 3
HP: 250 (750 total)
Points per Kill (Solo): 750 (2250 total)
Pray: Ranged (and/or melee if using melee)
Attack it with: Ranged or Melee
Notes: The Lizardman Shamans are bosses that you may recognize if you have ever fought them for slayer or for their Dragon Warhammer drop outside of Raids. Here in Raids though you will fight three, and you will want to pray ranged and attack using your best DPS setup (whether it be melee or range).
If attacking with a longer distance ranged weapon (e.g. Blowpipe, Crystal Bow, Twisted Bow), you may pray ranged as they will primarily attack you with their ranged "poison splash." NOTE: Only attack one at a time, start with one closest to you. If you see them wind up like so:
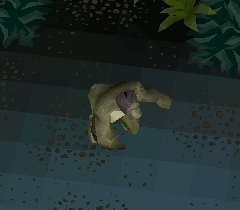
RUN! as they will do an unblock-able jump attack that can hit very, very hard. It is dodge-able though hence the running away.
Side note: They do not have a chance to drop the Dragon Warhammer when being killed inside the Chambers of Xeric.
Deathly Rangers
Amount: 4
HP: 200 (800 total)
Points per Kill (Solo): 600 (2400 total)
Pray: Range
Attack it with: Magic (barrage)
Notes: The easiest of all the rooms. Here you pray range, and attack the group of 4 archers with a barrage spell to quickly end them. 0 effort, easy progress. You can also kill these one by one with a Trident, a bow, or anything that can be used from a distance. Using a Twisted Bow is arguably as fast as killing them at the same time with barrage spells.
Ice Demon
Amount: 1
HP: 350
Points per Kill (Solo): 1050
Pray: Range (and mage if prayer switch)
Attack it with: Melee, Range or Magic
Notes: The Ice Demon is one of the easier npcs. You can pray switch its attacks, but with less experience it's easier to keep protect from ranged on all the time while killing him with ranged, as he does more damage with his ranged attacks than magic attacks.
During the fight, you may also prayer switch to protect between mage and ranged. In the ranged attack animation, the ice demon will pivot backwards and throw a large snowball. For the mage attack animation, the ice demon will put both hands in the air and attack you with an ice burst animation. The attack animations for mage and ranged are as follows:
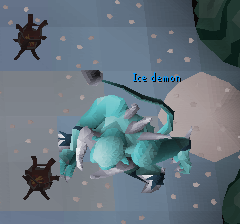
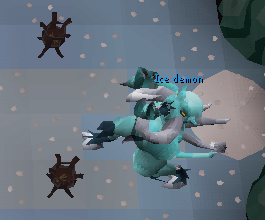
Ranged Attack Mage Attack
Skeletal Mystics
Amount: 3
HP: 200 (600 total)
Points per Kill (Solo): 600 (1800 total)
Pray: Melee if fighting close distance, magic if attacking from a distance
Attack it with: Range or Melee
Notes: The Skeletal Mystics are a set of 3 magic and melee using foes that can attack from a distance as well as with melee. You fight one at a time as you run through a maze of purple crypts. They are quite easy to dispatch though you will want to make sure you are within melee range at all times as they hit hard with magic, though a lot harder with melee (hence praying melee). IF you stay within melee range they will attack you with melee.
Guardians
Amount: 2
HP: 200 (400 total)
Points per Kill (Solo): 600 (1200 total)
Pray: Melee
Attack it with: Melee (or mage)
Notes: You can find the guardians at the end of the room at the door to the next room. They look like statues and will only attack you with melee if you initiate the fight. They don't hit very hard, and zero if you keep protect from melee on. Despite having fairly high defence, they are easy to kill.
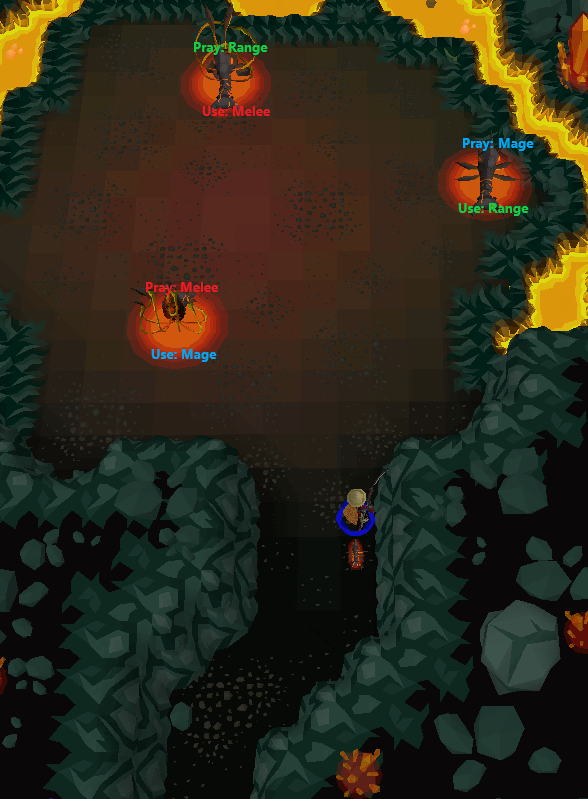
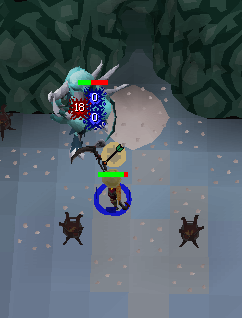
Olm Fight
After beating the previous 5 encounters, you will find yourself in a small room with a large green portal ahead. As soon as you click the portal and go through the fight starts, so be prepared.
Amount: 3 (Two hands and Head)
HP: 250 for each hand, 500 for head (1000 total)
Points per Kill (Solo): 1000 (3000 total)
Pray: Range and Mage
Attack it with: Reference Image below:
Notes: Before you enter the room, PRAY RANGE, as it will always attack with ranged first. Step through the green portal and begin your fight with Olm.
During the fight, you must TAKE OUT HIS HANDS BEFORE YOU CAN ATTACK HIS HEAD. THE HEAD MAY ONLY BE ATTACKED WITH RANGE OR MAGIC. It is recommended to use melee / blowpipe for the hands (whichever one has higher dps), and a Dragon Hunter Crossbow or Twisted Bow for the head.
Every few hits Olm will attack you with magic instead of ranged. If you're fast enough you can pray switch this magic attack. Both attacks are green, the ranged attack is a small green ball, the magic attack is a larger round projectile. Olm has a few special attacks which can do a lot of damage to you, when he starts doing one you need to act as soon as possible, failing to do so would likely result in a swift death. Unlike on OSRS, Olm only has only one phase instead of three.
Olm will use the following special attack sequence, in sequential order:
1) Crystal Burst
Olm throws a green crystal projectile under your character, growing fast and bursting under you within a matter of seconds, dealing a lot damage. Stacking with a regular attack has a high chance to kill you. Avoid this by running at least 1 square away as soon as the crystal spawns under you.
2) Acid
Olm spawns puddles of acid across the room, standing on these will do small, but very quick poison damage to you. At the same time, a poison puddle will spawn under you and keep spawning under you for roughly 10 seconds, you can avoid damage by running around until it has stopped.
3) Lightning Walls
From the east and west side of the room, 2 walls of lightning spawn, slowly going to the other side of the room. If you are hit by these lightning walls you will be stunned, receive damage and your protection prayer will be disabled. These walls have one, or more holes which you can stand in. You can avoid collision by standing on the right tile so you stand in the place where you go through the hole of the lightning wall. Don't forget the wall coming from the other side though!
4) Spheres
Olm spawns a sphere in a certain color which will float to your character, you can not avoid this. If this sphere hits you, you will receive a lot of damage. You can neglect the damage by praying right, accordingly to the color of the sphere:
Red sphere = protect from melee
Green sphere = protect from range
Purple sphere = protect from magic
5) Swap
Olm spawns a portal under you and under another player in the raid (or at a random tile within the room, if doing a solo run). You have to run to the other portal as fast as possible and stand in it until it disappears. Failing to do so will damage you (and the other player)
That being said reference the image below to see your priority for attacking, and what style of combat to use:
Drops
Drop Viewer
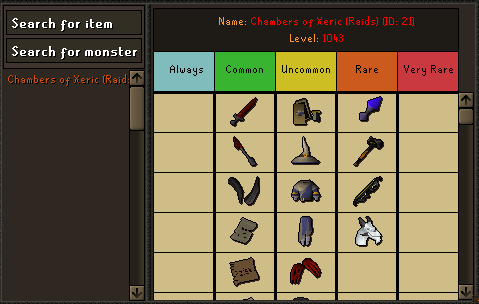
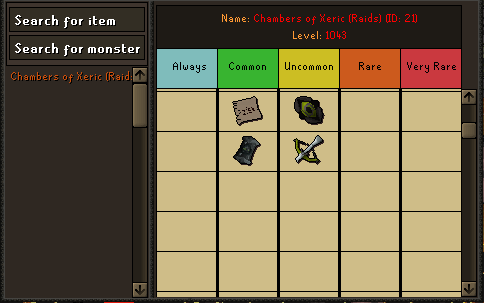
Referencing the 2 images above you can get an idea as to what unique items you can get from the Chambers of Xeric.
If you don't hit the rare drop table you can get various supplies as a reward, such as runes and skilling supplies.
Points Explained
The amount of points you earn in a Raid is what decides on your chance of receiving a unique drop. There is a soft cap and a hard cap for a chance at a unique drop. The soft cap is a minimum amount of points you need to have the slightest chance at a unique drop. The hard cap is the highest amount of points you can reach before hitting the max chance of having a unique drop. Having more points than this hard cap will not further increase your chances. Also, the more points you have, the higher your supply drop will be if you don't get a unique item.
Here are the general rules for getting rares and how points work in Raids:
You need 2500 points to be eligible for the rare drop table
2500 points is a 1 in 43 chance for a unique drop (having less than 2500 points after Olm has been killed will leave you hopeless at a drop).
Every 360 points after 2520 increases your chance by 1 (2880 is 1 in 42 , 3240 is 1 in 41, etc)
12500 is the hard cap for points with a 1 in 15 chance for a unique drop. Any amount of points higher than 12500 after Olm has been killed will not further increase your chance at a rare drop.
Side note: There is little difference between running a solo or group run regarding points, except the hard cap is set at 12000 in a group run instead of 12500, leaving you a slightly smaller chance to receive a unique drop (maximum of 1 in 16 at 12000 points). This is of course highly compensated with the speed you finish a run, and the fun you have when doing things together.
Drop Rate Reduction
The drop rate reduction also applies in the Chambers of Xeric, but it does not just increase your chance at a drop. The percentage your DR is reduced is multiplied by your total points (but at a lower ratio), this means that your DR reduction percentage lets you reach the hard cap earlier, maximizing your chance for a drop at an earlier stage. Some examples:
The hard cap for a rare drop is 12500 points, which translates to a 1 in 15 chance at a rare drop. (Or 12000 points in a group, which translates to 1 in 16)
Drop rate reduction is only 85% as effective in Chambers of Xeric. This means that if you have a 30% drop reduction, it will multiply your final point count after Olm by (1.3 * 0.85) = 1.105. You may find your own point multiplier by using the equation ((DR reduction / 100 ) + 1) * 0.85 (The multiplier cannot be lower than 1)
Example: After you've killed Olm you have 8000 points. If you have a 30% DR reduction the game calculates your drop by the following points: 8000 * ((30 / 100 ) + 1) * 0.85 = 8840 points. Or you may simply multiply your final point total by the converted multiplier, found using the equation in the above paragraph (8000 * 1.105 = 8840). So while you've gained 8k points, the game acts as if you had 8840 points, thus giving you a 1 in 25 chance at a drop instead of 1 in 27.
12500 is the hard cap for points with a 1 in 15 chance for a unique drop. Any amount of points higher than 12500 after Olm has been killed will not further increase your chance at a rare drop.
I will list some examples for the point totals required to hit the cap of 12500 or 12000 depending on your drop rate %:
Solo (12500 cap) Group (12000 cap)
20% DR: 12255 11765
30% DR: 11313 10860
40% DR: 10505 10085
50% DR: 9804 9412
60% DR: 9192 8824
70% DR: 8651 8305
75% DR: 8404 8068
Unique drop tables
The 1 in X rates mentioned above are about the chance of receiving ANY unique item drop. The chance of receiving an item from the common table is logically a lot higher than from the very rare drop table. Each table has their own unique number of which you have a chance at roll, common being the highest chance, and very rare being the lowest chance.
No Comments