
Starter Guide
Runerealm Starter Guide

Table of contents
- Introduction to the server
- Making an account
- Game interface
- Custom features and teleportation
- A tour through Home
- Getting started
Editor's note
This guide mainly focuses on players who are new to playing Runescape Private servers and therefore there is a lot of basic explanation. If you wish to learn specifically about our custom features, please skip to the Custom features and teleportation part.
Introduction to the server
Welcome to Runerealm! You have set your first step into greatness! Runerealm is an Oldschool Runescape based custom private server. This means Runerealm is not owned or developed by Jagex. The owner and developer of the Runerealm server is Alex. My name is Daniel and in this guide i will take you on a tour through Runerealm to give you some basic information on how to play the game. Make sure to join our discord and read the server rules before you start playing at https://www.runerealm.org/discord or check out the other section on this guide.
Making an account
Make sure to read the rules before you start playing: https://wiki.runerealm.org/books/starter-guide/page/runerealm-game-rules
When you've chosen a username and password and login for the first time, you will see a screen where you can select 8 different game modes!
- A normal account gives 50 times the XP rates of OSRS.
- An extreme account gives 10 times the XP rates of OSRS and 20% increased drop rates, for example: If the King Black Dragon would drop a pet with a 1 in 1000 rate, the drop rate on an extreme account would be 1 in 800.
- An ironman account can not interact with only players in any form of gameplay except talking, like trading, kill bosses together or use the auction system. You can choose between a normal ironman or extreme ironman, stated rules above will apply.
- A hardcore ironman account has the same rules as ironman, except you only have one life. If you die an unsafe death, your account will be revoked to a regular ironman. Same as ironman, you can choose between normal or extreme mode.
- An ultimate ironman has the same rules as a regular ironman except you can not use the bank, so storing your items is limited to the available bags. Last but not least, as an ultimate ironman you also have the choice between normal, or extreme mode.
You have to choose a game mode before you can proceed. When you've made your decision, click the game mode and select confirm. When you've done this, the mode is permanent. Welcome to Runerealm...
Game interface
When you've chosen a game mode you'll get a first glimpse of the world of Runerealm. A calm center filled with bank booths around you, some chests around you, a huge fountain in the back, a fight pit in front of you, before we go through all of this i will explain the game interface. If you've played Runescape, Oldschool Runescape or another RSPS before a lot of this will sound familiar to you and you can most likely skip this part till the custom features part. However, i highly advice all new Runerealm players to check out the settings to find out some of our (custom) game enhancements. You can walk around by clicking on the game screen or clicking on the minimap.
The number next to the red heart left of the minimap shows your hitpoints. You can right click the heart to toggle to show your hitpoints above your accounts head. If this number reaches zero, you will die. The number next to the cross below the heart are your prayer points. You can right click the icon to select and quickly toggle selected prayers on. If this number reaches zero, you will have to recharge at an altar, rejuvenation pool, or consume any form of prayer restoration. The number next to the yellow foot show your energy. You can click the foot to toggle running or walking. Running uses energy, when you reach zero energy you can only walk. This will recharge back slowly to 100, or you can consume an energy restoration potion. On the bottom is shown special attack, some weapons have a special attack, which will consume some, if not all of your special attack points. You can click the icon to toggle your special attack. When they are below 100, they will recharge 10 percent by every 30 seconds.
On the right bottom is your money pouch, you can store your gold in here. You can right click gold in your inventory to deposit in your pouch, and you can right click the icon to withdraw gold, or examine it to see the full number. On the top right you can click the globe icon to see a larger version of the minimap. Above the heart icon is a compass, and at last, left of it you will see a circle with XP in it. You have various options on this, showing or hiding XP drops, hide skill orbs, toggle on/off lvl up messages and lock your XP.
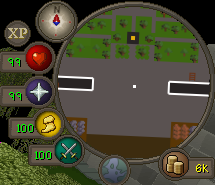
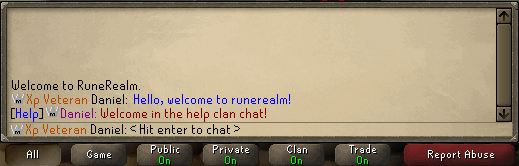
On the bottom of the game screen you will see the chat box. You can type here to talk with your friends, ask for help in the global clan chat or type in certain commands. You can choose to show only certain messages, show all, or even nothing by clicking the buttons on the bottom. If you click Report Abuse, you will see all of the online staff members.
On the right side of the screen, below the minimap, there are some various interfaces and menus. At first, top left, we have the combat interface. You will see your combat lvl here, select your combat style, if you are wearing a staff you can select a spell and if you've equipped a weapon with a special attack, you can select it here. You can also toggle your retaliation, if it's on, you will always attack back if you get attacked, if you have it off, you will not attack back automatically when you are being attacked for the first time, or after you've done something that stops combat, like eating or moving.
Second top we have the skills interface. You will see all the available, skills, your levels and total lvl here. All the levels of your skills combined is your total lvl. If you click the skill, your character will shout your lvl and xp in that skill. For all the skills, 99 is the highest level you can reach.
Up next third, top left, we have the quests/achievements interface. You can see all of the quests here Runerealm has to offer. Click the quest to see more information about how to start this quest. If you need assistance on completing these quests there are some guides on our wiki. Click the green icon to show the achievement diary. You will see an interface with all of the available achievements, sorted by difficulty. Click the X button to close this interface.
Top middle we have the inventory. Here are the items shown you carry around. You can have a total of 28 slots available in your inventory. There are a few bags in game to extend your inventory for limited items, for example, a herb pouch to store herbs, or a looting bag to store 28 additional items.
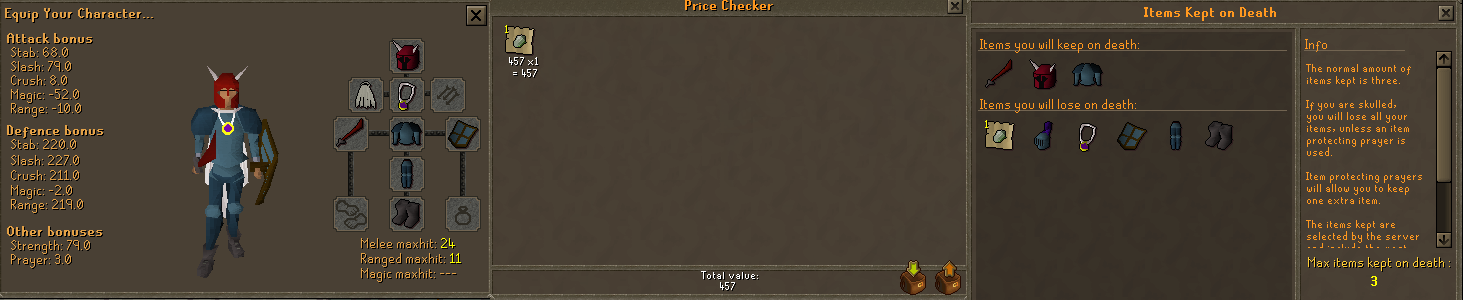
Next up 3rd top right, there is equipment, you will see your equipped items here. Clicking the bottom left icon in this interface will show more details about the equipment you are wearing, the icon next to it is a value checker, you can add items to this interface to check it's value. You can not put untradeable items in as they have no (trade) value. The skull icon shows which items you will lose and keep if you die. The whistle will call your pet, should you have one.
Up next, top, 2nd from right, we have prayer. Your prayer level is the amount of prayer points you have. Selecting a prayer will give you temporary boost at the cost of prayer points. These points will deplete over time. The more prayers you have on, the faster it will deplete.
Top right, we have the spellbook. By default you have the normal spellbook. There are 3 spellbooks ingame, normal, Ancient Magicks and Lunars. How to switch from spellbook will be shown further in the guide. You can left click a spell and then click a target or item, depending on the spell to use it. To cast spells you will need runes and the required magic level. Every combat spell will be able to hit its maximum damage at the lowest lvl you can cast it. The higher your magic lvl, the more accurate your combat spells will get. You can also auto cast a combat spell if you are wearing a staff or wand in the combat interface. Note that even tho the Arceuus spellbook is not available, the reanimate souls spell is available in the normal spellbook at level 87 magic. This can be used on ensouled heads for prayer xp.

Bottom left first, there is Clan Chat. By default you are in the 'Help' cc which is the main cc most of the players are in. You can talk in here by hitting /before starting your sentence. You can also leave this chat and join another players cc, or set up your own cc. Next we have friends and ignore list. On your friends list you can add people to send each other private messages, and they will show up as green dots on your minimap. If you have a player on your ignore list, you are unable to see them talk. On the middle is the door icon, you can log out by clicking here. You can not logout if you've been in combat shortly before clicking this.
Next up we have the player interface, i will tell about this further in the guide. Next up, bottom 2nd to right we have options. You can change some options here to enhance your gameplay. There are alot more options you can select/deselect on the bottom right icon, like change F key bindings, shift drop, WASD camera and many more. Last up bottom right we have emotes. You can click the icons to perform an emote.

Custom Features and teleportation
Runerealm has a wide variety of custom features. I will first go through the ones on the player management interface and after that, i will talk about the custom features in the rest of the game. A lot of the npc locations are shown on the home tour part.
The icon next to the logout interface button, is the player management setting tab. This interface contains 4 tabs. By default you will be on the second of left. This will show some stats and information about RuneRealm and your account. First of you will see the amount of players online. You will also see if, and what kind of Event is on. Every 30 minutes a new event will start, click on 'Event' to see how long until the next event starts, this will end the current event. there are 4 kind of events:
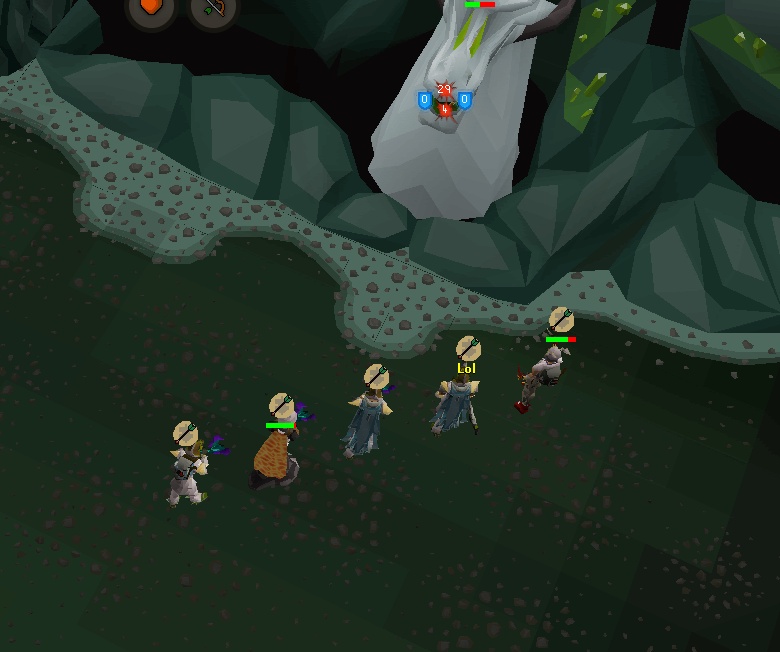
Boss event: Kill a random event boss at a certain place. This is a very strong boss that requires several players to kill. The event boss has 5000 hitpoints. The player with the highest amount of damage done will get 25k blood money and an event key. If you've done over 500 damage, you will be awarded an event key as well. If you've done between 100 and 499 damage you will get a mystery box. If you've done less than 100 damage you will get no reward. Beware that this boss can kill you, and sometimes spawn in the wilderness, where other players may be able to attack you as well!
Skilling XP event: Hit a global counter of 30M or 50M experience points. Within 30 minutes all participating players need to skill to get enough experience points to reach the set goal. If the goal is not reached within 30 minutes, no one will get a reward. If the goal is reached within 30 minutes and you've got at least 1M xp, you will get an event key. If you've done between 100K and 1M XP you will get a mystery box. If you've done less than 100K XP you will get no reward. Remember, there will only be rewards IF the global goal is reached within 30 minutes. All accounts will contribute to the global counter as if they were normal accounts. Temporary XP boosters (Like double XP tome or Well of Goodwill, will explain later) do not give extra XP towards the global goal. Extreme accounts will still get the same amount of xp as normal however, the xp they will get will be multiplied by 5 so that everyone contributes the same amount of XP to the global counter. Combat skills will NOT contribute towards the global counter. Even though prayer and slayer have a lot to do with combat, they DO contribute to the event.
Skiller event: All skills that gives out resources (Mining, fishing, woodcutting) have a chance to give double resources. Certain skills (Firemaking, cooking, smithing, fletching, crafting and herblore)have a chance to do a double action, for example, burn 2 logs in the same action instead of 1. There is no (global) goal or extra reward in this event.
Double blood money event: During this event, all blood money dropped by monsters is doubled!
Drop rate event: During this event, all rare drop rates are boosted by 5%! This includes all bosses and even raids! When you examine a monster or reward chest, you can examine it to see current drop rate. If the event is on, your drop rate will automatically have the 5% extra added.
Below events you can choose your rank, which allows you to change the icon next to your name. You can click the ranks to see if they are obtainable for you, and how. Below this you can see some stats and points from your account. What you can do with some of these points will be explained later.
The 2nd from right tab shows the player panel. Commands list shows some commands you can typ in chat to perform certain actions. Remember that you must only typ in the command starting with :: or ;; and no other text can be before, or after the command.
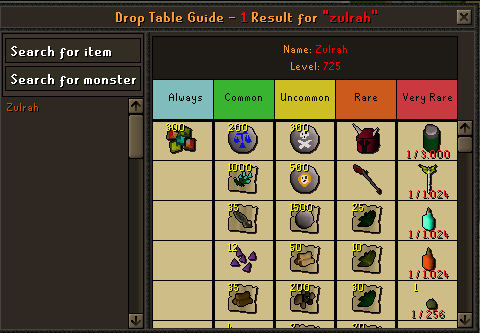
Drop Table Guide opens an interface where you can search for certain items, or monsters to see who drops them, or what the monster drop. Click the Search for... button to typ in what you are looking for. A list will pop up with monsters that you've looked for, or the item they drop you've searched for. Click the monster's name to see its full drop-table, including drop rates on very rare items! Note that you can examine a monster aswell to view its drop-table!
There is an in-depth guide on how drop rates work and how you can increase your drop chances. I will post a link at the bottom of this guide.
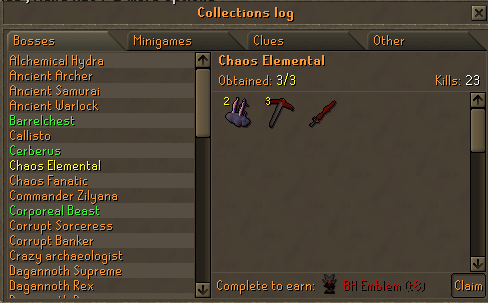
Collection logs will open an interface that shows a list of various monsters, bosses and other contents with rare drops you can collect. If you've collected all unique drops from a certain NPC you can claim a reward. Click on any NPC to see what reward you can get, there is some very unique stuff to obtain such as RuneRealm credits, donator chests, and even a very unique Lucky Ring Imbue scroll! If you have completed a collection log but have not claimed your reward yet, the text will be yellow. You can click the claim button to claim your reward. If you've claimed your reward, the text will be green.
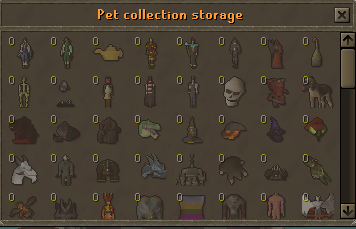
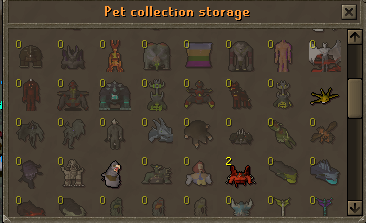
Pet Storage will open an interface where you can store your collected pets. This is a handy feature to keep all your pets together, especially for ultimate ironman who have limited item storage!
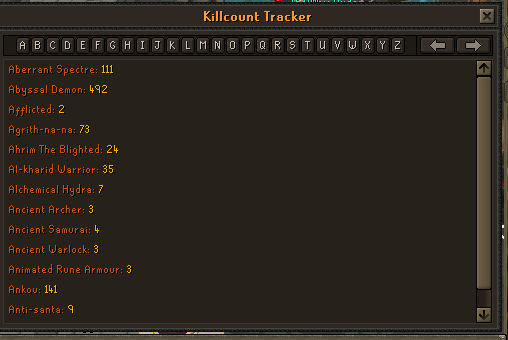
The Killcount tracker keeps a history of all the npc's you have killed. It is sorted by letter which makes it very convenient to search certain npc's.
The pet storage allows you to store your obtained pets, this is very handy for ultimate ironman, or if you just want to never feel alone. You can deposit pets from your inventory and withdraw them from the storage at any time.
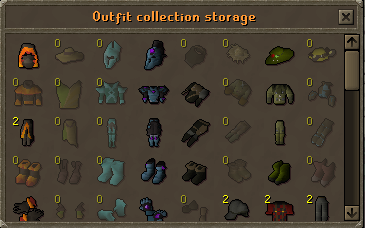
Outfit storage allows you to store skilling outfit pieces, this is especially nifty for ultimate ironman, or if you just want to keep your wardrobe with you at any time. Skilling outfit pieces can be obtained from skilling caskets from the skill points shop. They give a small xp boost to it's respective skill, and a little extra bonus is applied when wearing a full set. Side note: The xp boost is only gained when the equipment is worn, not when it's in the storage.
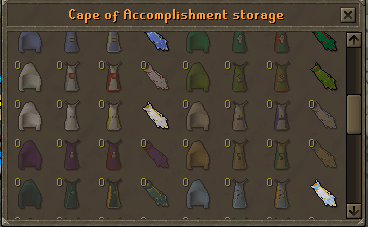
Cape of accomplishment storage allows you to store your skill, trimmed skill and max capes. Since there are a lot of them they can use a lot of space in your bank (or inventory as an UIM) which makes this storage very useful if you want to collect them all.
Donator Info will open a link to the Runerealm store. On the bottom of the web page you will be shown what kind of donator ranks there are, how much you need to donate to hit certain ranks, and what their perks are!
Rank selector shows the same interface as clicking your rank in the first interface said earlier.
Title selector allows you to show a title next to your name, in addition to your rank. Your title will be shown when talking in public or yelling.
AFK chair selector allows you to choose a chair that your character will sit on when you go AFK. If you don't interact with the game for at least 15 minutes, your character will go in AFK state, sitting on a chair and stopping combat with npc's.
![]()
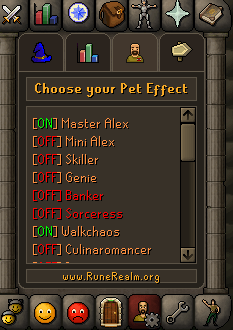
Pet Effects open a menu where you can select a pet effect. Certain Pets on Runerealm give some extra effects. You must have collected this pet and have it follow you at least once to enable the pet effect. After that, you can toggle the pet effect on and off. You can have out any pet and select a different effect. You can have one pet effect on. Extreme Donators can have 2 pet effects on at the same, Elite Sponsors even 3.
Master Alex combines the effects from Mini Alex, Skiller Pet and Genie Pet. (requires all 3 pets and 300M cash, use these on each other to create the Master Alex Pet)
Mini Alex: Has a turmoil effect, every attack has a chance to give back 25% of the damage you've done back to your hitpoints. You can buy this pet off the donator Guide
Skiller pet: Gives you 25% extra XP in all skills. You can buy this pet from skill points shop or Donator Guide.
Genie: Reduces your drop rates by 5%. You can buy this pet of Boss Points shop or donator guide.
Banker: gives you access to a mobile bank. You will need to have the actual banker pet to follow you to use this. Click on your banker pet to access your bank. You can have the banker pet follow you and have a different pet effect, this disables the bank option. The banking option does not work everywhere in the game, such as certain bosses, mini-games and the wilderness. You can get this pet as a drop from Corrupt Banker boss, A boss only accessible by Extreme Donators or higher.
Sorceress: This pet will pick up items from a certain Rarity, you can toggle this in the interface player panel, below the pet effects menu. You can obtain the Sorceress Pet from the Corrupt Sorceress Boss, a custom boss available to Donators and higher.
Walkchaos: This pet gives you a 5% increased drop-rate in the wilderness and increases your magic damage and accuracy by 15%! You can obtain this pet as a rare drop from the Walking Chaos boss.
Culinaromancer: Combines the pet effects from the pets obtained as a drop from the Recipe for Disaster bosses. You will need to unlock these pets in the following order after completing the Recipe for Disaster Boss. You can NOT skip a pet, or choose to do another one first.
Pet Agrith Na-Na: Increases your ranged accuracy by 10%
Pet Flambeed: Increases your defensive by 10%
Pet karamel: Increases your magic accuracy by 10%
Pet Dessourt: Increases your melee accuracy by 10%
All other pets below are skilling pets, which you have a chance to obtain by performing a skill. Most skills have 2 pets, one which can be obtained anywhere, and the other only being available at the donator/sponsor zones. The skilling pets offer 10% increased XP to the chosen skill. This pet effect can not be combined with the skiller pet/master Alex pet.
As mentioned before, below the Pet Effects Menu is the Sorceress Pet Menu.
At last we have call follower, which will summon your pet if it's not following you anymore because it got stuck or lost somewhere.
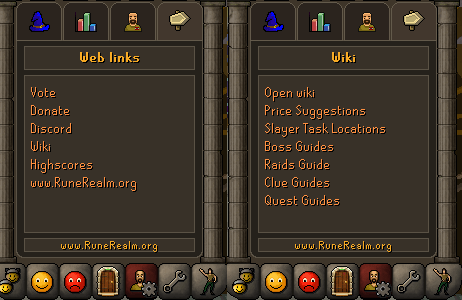
The most right tab is Web Links, which shows some links to our websites and discord. Clicking Wiki will open another interface with a link to our Wiki's main site, aswell to certain guides.
At last we have the Teleportation tab on the left side. This has all the teleportations that are available in the spellbook combined in one interface. Note that all spellbooks have the same teleports available. Also, teleport locations that are shown in red text are located in the wilderness and potentially dangerous, locations that are a little greyed out are inaccessible, click on this to find out how to unlock it.

Training teleports
Training teleports contains various teleport locations to a lot of combat training spots, starting from low lvl monsters like Cows and Rock crabs, scrolling down further you will find a lot more bigger locations such as slayer areas, cave horrors, Wyverns and Metal dragons.
Skilling teleports
Skilling teleports offer teleport locations to various skilling areas. Some of the areas are at home which you will see in the home tour, but there also some locations through the game, like agility courses, the gem mine, the farming guild and the Puro-Puro hunter area.
Boss teleports
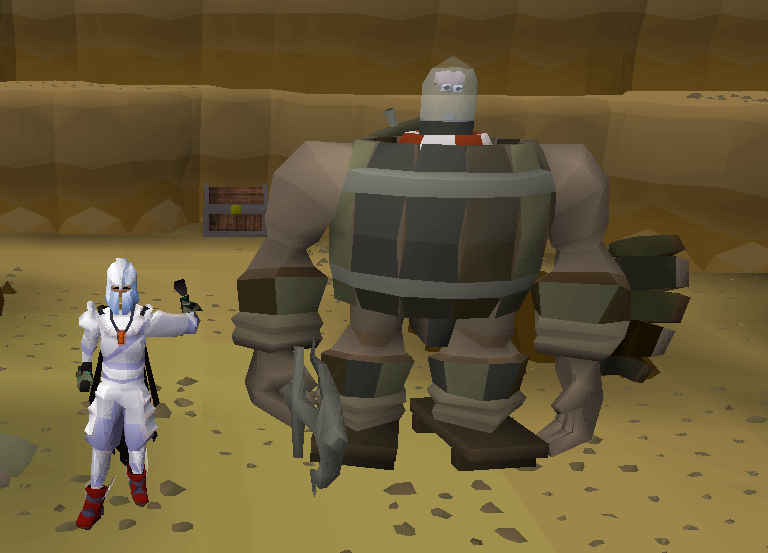
Boss teleports offer teleports to Boss areas. Some Bosses are instanced and some bosses can be done with multiple people. GWD teleport will bring you to the center of the Godwars Dungeon allowing you to train in the GWD or choose a boss to fight. Remember you have to get Killcount for a certain boss first to access the boss. In contrast to OSRS, you will only need 10 KC instead of 40 to access one of the GWD bosses. On the bottom are also wilderness bosses locations. Note that even Tho King Black Dragon lair is a safe area, the teleport spot is located in the wilderness, thus being a dangerous teleport!
Cities teleports
As the name says, this menu has teleport locations to most of the notable cities and towns through the map. The donator, sponsor zones are also in this menu, aswell as the custom gambling area.
Mini-games teleports
At Fight Caves you can fight various waves of monsters, ending up challenging Tz-Tok Jad, a level 702 boss. Unlike OSRS, Fight Caves only have 15 waves instead of 31. Beating the Fight Caves awards you the Fire Cape. Same for the Inferno, although being a lot harder than fight caves, this only has 31 waves instead of 63. Beating the Inferno will award you with the Infernal Cape.
Raids teleport brings you in front of the Chamber of Xerics. You can enter the Chambers by clicking the big doors. If you are in a clan chat, you need a certain rank to enter the Chambers and create a group raid. If you wish to solo the raid, use the right click option on the door. If you wish to enter the raids with a group you can create your own cc or enter the raids with a person who has the sufficient rank in help cc. When you've completed at least 100 raids, you can enable 'hardcore' mode for the Chambers of Xeric. This mode makes CoX a lot more challenging, but also increases your chance of unique rewards. You can talk to Captain Rimor in front of the entrance to toggle hardcore mode.
There are guides written on the Fight Caves, Inferno and Chambers of Xerics which can be found on this wiki. Links will be at the bottom of this guide.
Wilderness Teleports
At last there are some teleports which will bring you into the Wilderness, or locations close to the wilderness such as Edgeville and Mage's Bank. Note that almost all of these locations are dangerous teleports!
Side note: To get quickly to Castle Wars and the Digsite, you can craft and enchant respectively A ring of Dueling and a Digsite pendant which allows you to teleport to these locations, 8 times for Dueling Ring and 5 times for Digsite pendant.
Other Custom Features
Prestige
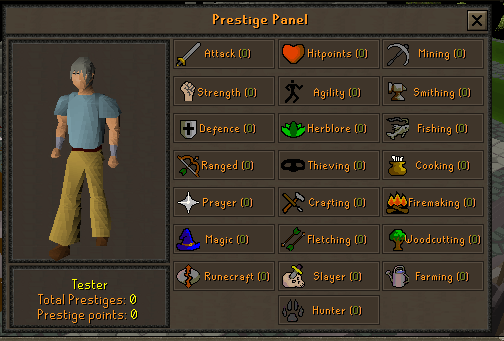
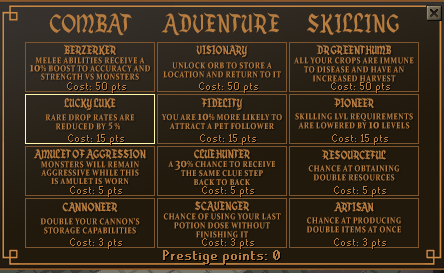
You can prestige a skill when you’ve reached level 99. Talk to Patchy at home or right click him and select prestige. Prestiging a skill will set your level back to 1 and XP to zero (lvl 10 for hp), but will give you a monetary reward and a prestige point. Extreme account receive 3 points for prestiging a skill. You can prestige a skill up to 10 times, making the maximum amount of points for regular accounts 220 and for extreme accounts 660. To unlock an ability, talk to Patchy or right click him and select abilities. There are 3 categories and each category has 4 abilities. Going from bottom till top, you have to unlock the previous ability first to unlock the one above.
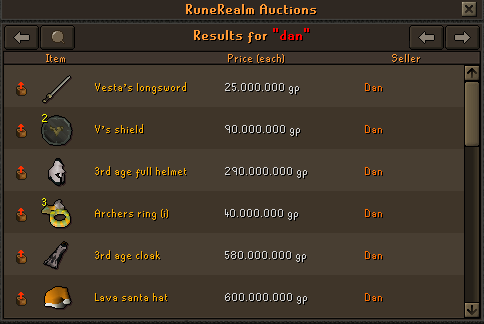
Auction
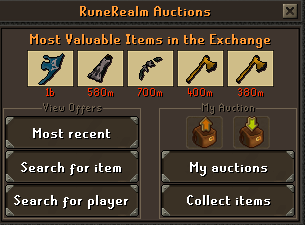
RuneRealm has an Auction system where you can buy items off other players or put items for sale. You can access the Auction system by right clicking any bank booth. On the home screen you will see the 5 most valuable items for sale and some buttons. You can check all of the auctions starting from most recently added by clicking 'Most recent', you can search for a certain item or player, you can put up a sale or buying offer by clicking respectively the up and down arrow, you can check which auctions you currently have up, and you can click collect items if there are bought items, cancelled auctions or money from sold items waiting for you.
Currencies and points
Apart from the regular currencies and points like gold, warrior tokens, tokkul, slayer points etc. there are also some custom currencies and point systems in game.
Blood Money
Blood money can be obtained mostly by killing monsters that drop it. Blood Money can be spend in the blood money store for some unique items, supplies as well as the highly anticipated Samurai and Ninja sets, where a full set respectively increases melee or mage attack speed.
PVM points
Most npc's give PVM points when you've killed them. The stronger the monster, the more points you will get. The PVM shop at home sell PVM supplies and some gear as well.
Boss points
Boss points are obtained through by guess what, killing bosses. All bosses award one boss point per kill, Corporeal beast gives two points and Killing Olm at the Chamber of Xeric award 3 boss points. The boss point shop at home sells even stronger gear pieces than the PVM shop, as well as some other unique items such as a looting bag and the Genie Pet!
Skilling points
You get skilling points through, well... Skilling! Every skilling action can give skilling points and they can be spend at the skilling point shops in the shopping area at home. The skilling shop has some unique rewards like the skilling pet, Smouldering Stone and various other items!
Bounty hunter points
Bounty hunter points are obtained by collecting mysterious emblems and handing them in at the Emblem Trader. You can find the Emblem trader at the shopping area at home or in the Revenants cave. Mysterious emblems can be collected through wilderness slayer tasks, killing wilderness bosses or killing other players. The bounty hunter shop sells some unique rewards for those who wish to PVM less and PVP more!
Gambling
There is a custom Gamble zone in the party-room in Falador. This is also the place where drop parties are hosted! You can get here by typing ::gamble or using the Falador teleport, or Gamble zone teleport in the city teleports menu.
You can bet gold on a Terrorbird by talking to Bookie. When you've done this, Bookie will announce the game is starting within a minute, so other players can join in. If you lose, you lose your money, if you win, you get your bet times 3. You don't win money betted by other players. You can play a game of Rune-draw against the Gambler npc, and you can play a game of Flower Poker against another player, by right clicking them and select challenge.
A tour through home
Closing off this guide i will give a tour through the home area, show off the donator areas and give some tips what to start with the game
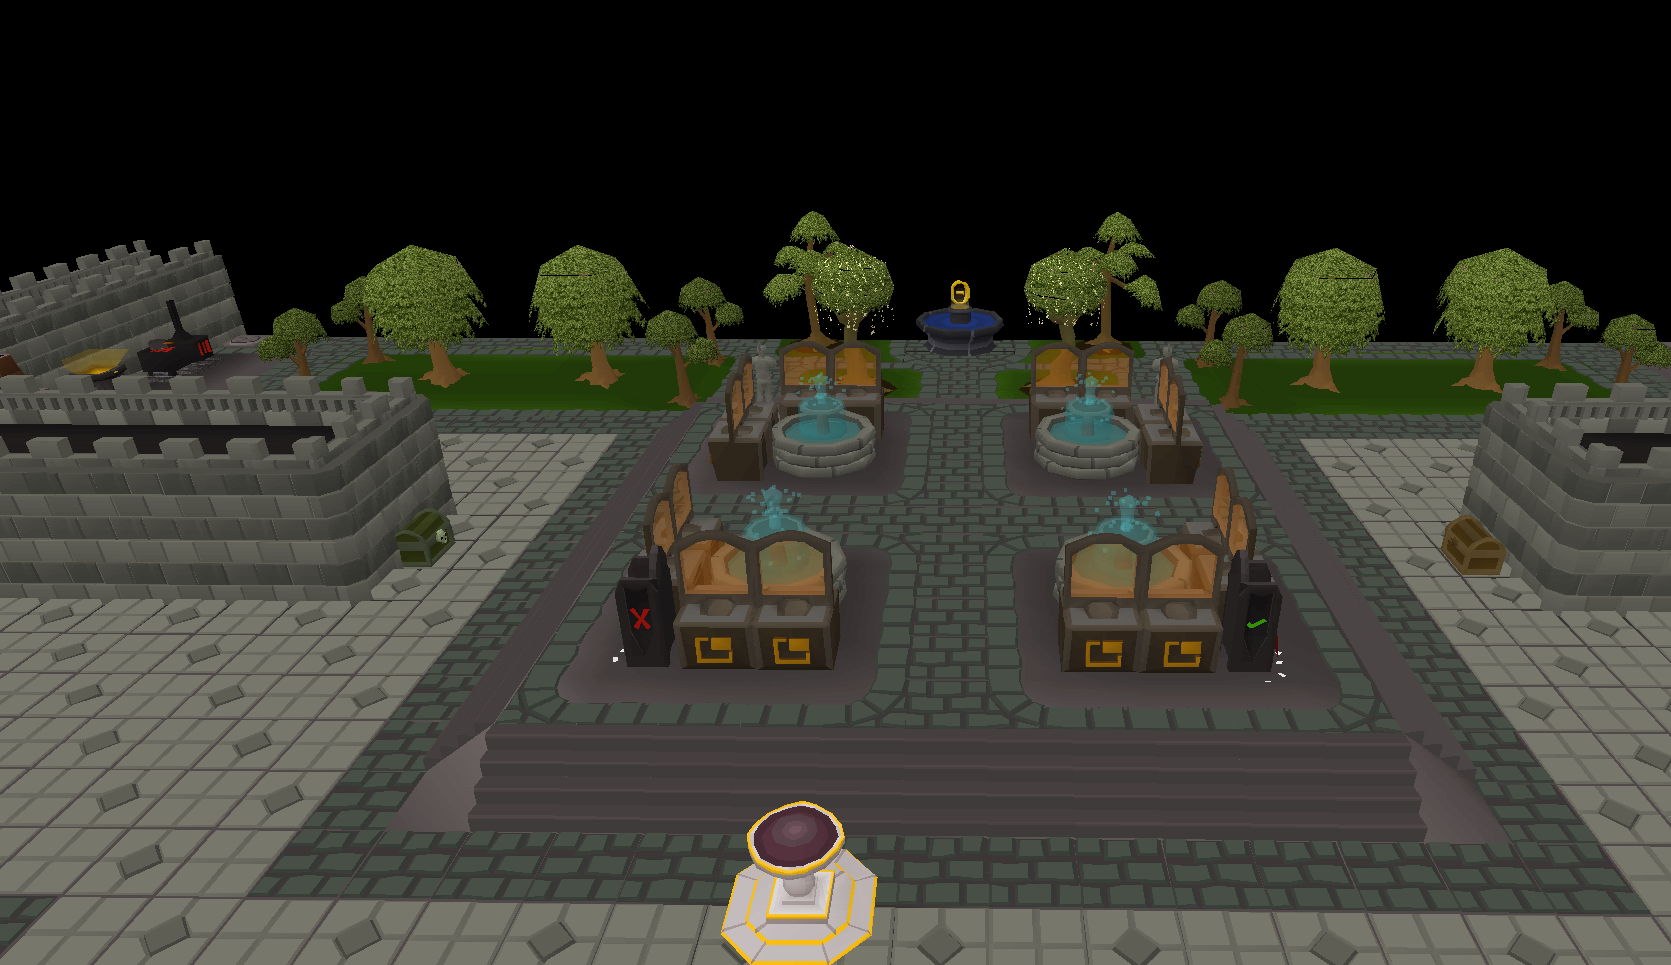
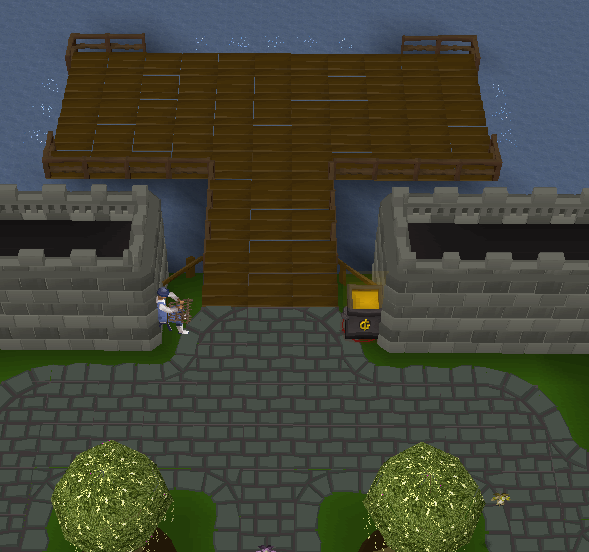
When you log in for the first time you start at the centre of Home. You are surrounded by bank booths, the southern corners have vote booths which you can click to open the vote points shop and open the web link to vote on RSPS websites: www.runerealm.org/vote

You can trade the Donator Guide to buy some unique items with RuneRealm Credits, which are obtainable through donating. The ironman guide will give ironmen their respective armor should you've lost it.
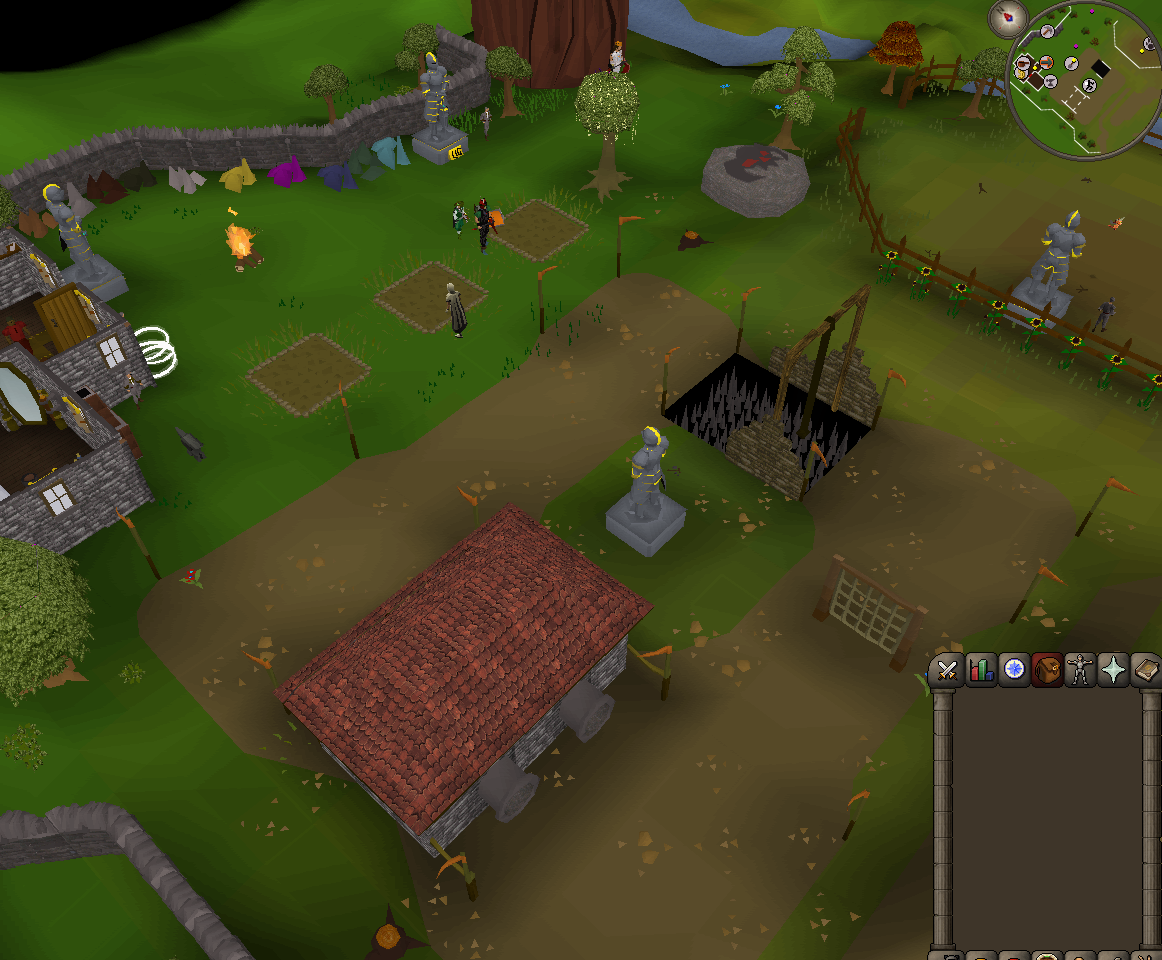
Walking east, south of the wall you will find our shopping area but before that you will see a chest, you can open this with a crystal key or sinister key. Examine the chest to see it's loot!
In the shopping area you will find pretty much everything you need to get a quick-start into the game, provided you have some gold. Be sure to check them all out, apart from the usual suspects like armor and food shops, there are also some pretty neat custom shops like cosmetic items shop, clue item shops (which sells most of the items required for clue scrolls) and skill points shop, where you can spend points acquired by skilling on some unique items!
You will also find the herbalist/Decanter here, who will decant your potions or turn your herbs into (unf) pots for a fee. In addition to the Revenant caves, you will also find the Emblem Trader here, who will take your Mysterious Emblems obtained through wilderness activities for points, which can be spend in the trader's shop.
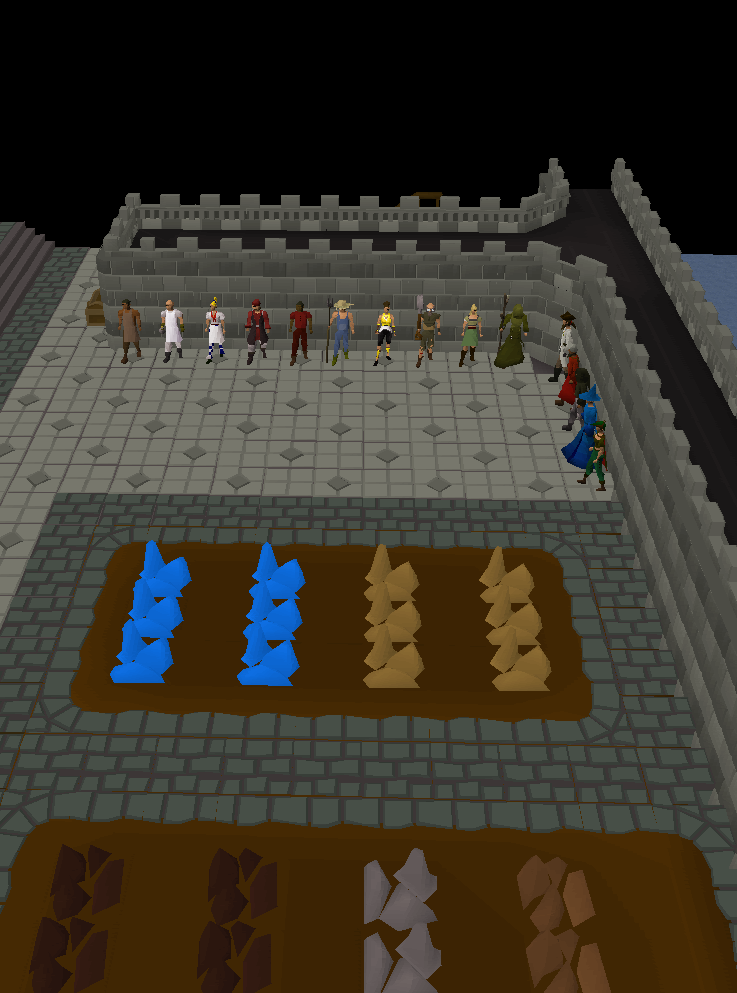
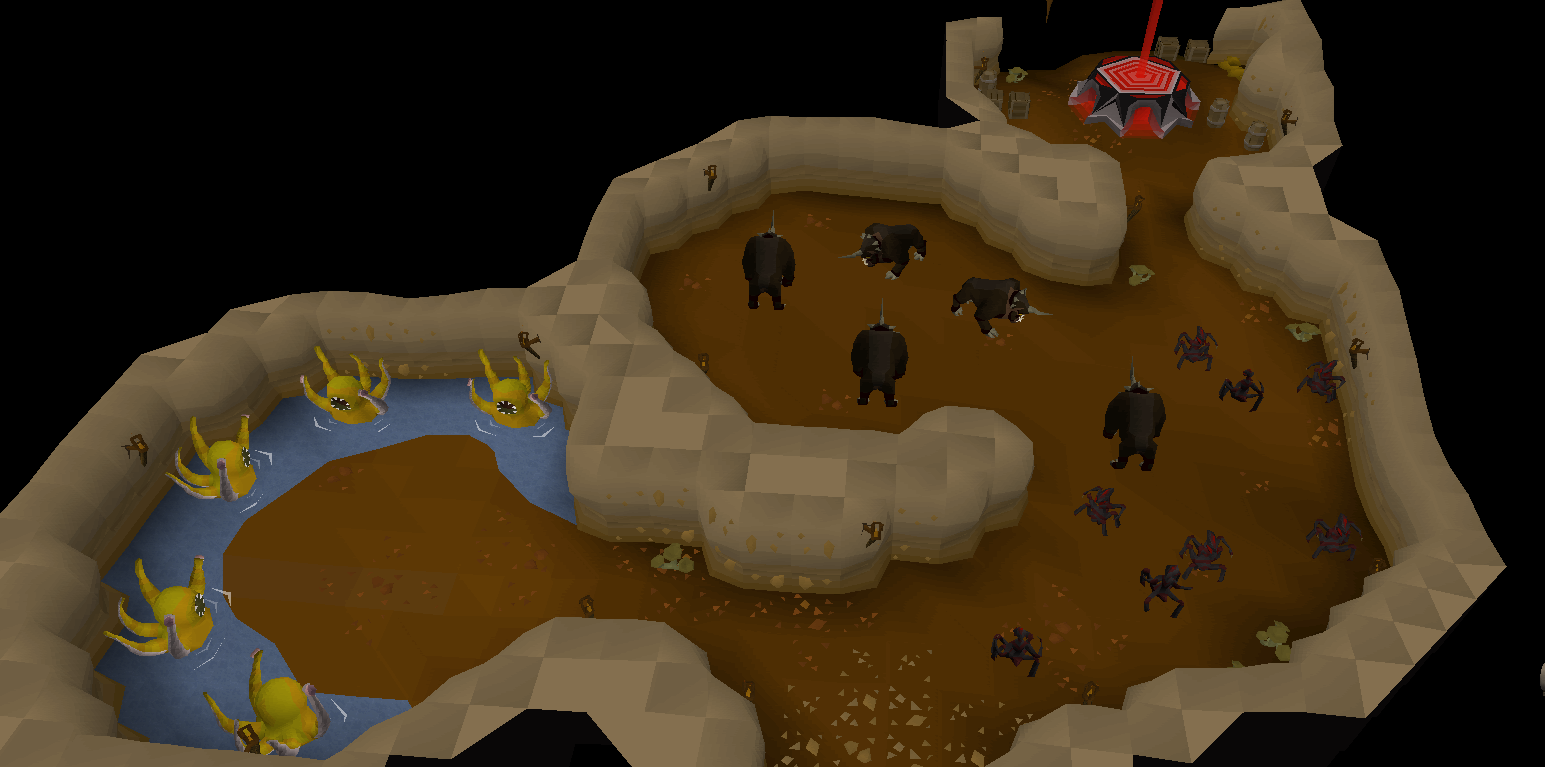
South from the shops you will see some rocks where you can start training mining. Going west from these rocks you will find some of our custom shops where you can spend Blood Money, PVM and boss points, as well as two slayer masters. Vannaka gives you tasks where you can use difficulty from easy up to hard, or wilderness only monsters. Nieve assigns Boss only slayer tasks for a small fee of 500K cash. To cancel your task, click assign again on one of the slayer masters and click cancel task. This will cost you a small fee and reset your slayer task streak. Blocking a task will also reset your slayer task Streak. You can extend any task permanently for a fee.
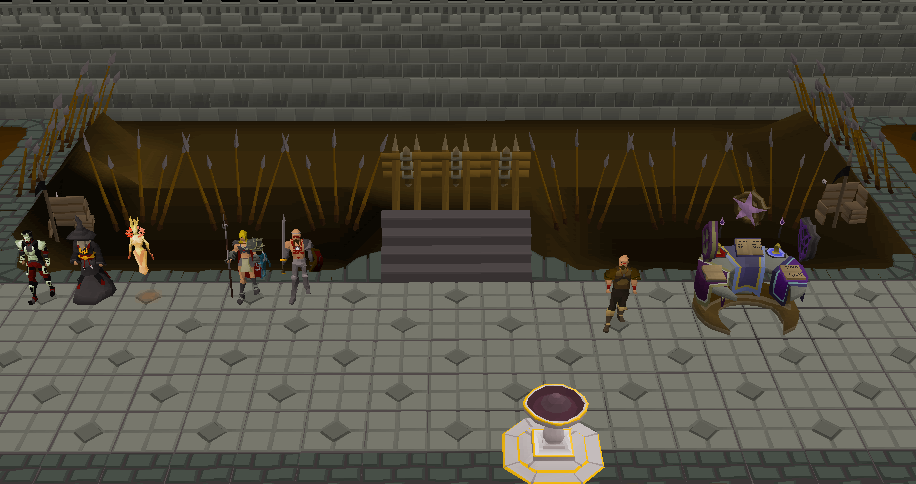
Up next is the fight pit, where occasionally an Event Boss will spawn which you will need to bring your friends to kill! Note that this fight pit is a Free-for-all combat area, where every player can attack each other! Don't worry, you won't lose any items if you die here. Between the fight pits and the bank is the rejuvenation pool, click this to restore all of your stats, curing poison, and refill your special attack and run energy. Up next we have Otto Godblessed, who can turn Zamorakian Spear into a Hasta. Next to him is the magic altar, where you can choose to switch from spellbooks. Going further to the west you will find some higher level mining ores.
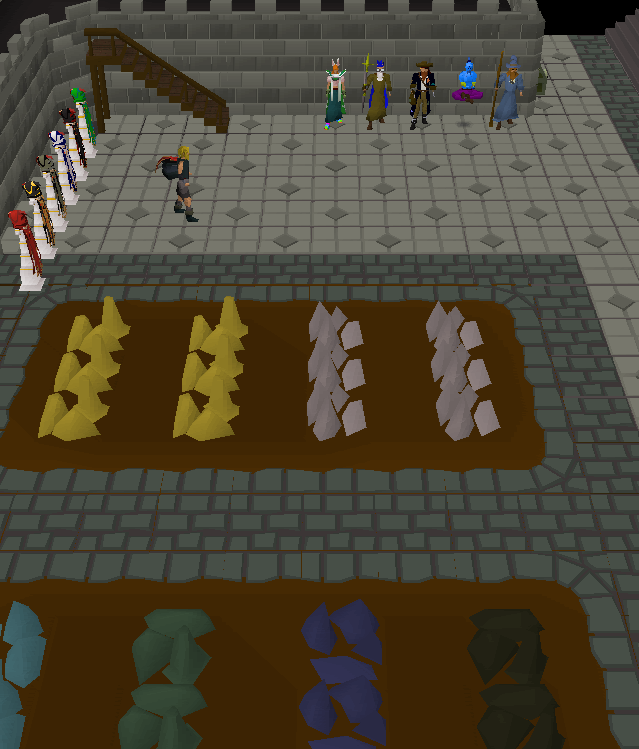
North from these mining ores you will find a select group of npc's. On the west wall You will find Mac, who will sell you a max cape if you've reached level 99 in all skills! He will also sell you different variants of the max cape provided you have the required capes in your inventory. Leaning against the north-western wall we start with Twiggy who will give you rewards when you've completed achievement diaries. She will give you a full set of the Achievement Diary armor set every tier you complete. Easy awards you with tier 1, medium with tier 2 etc. This equipment will give you a small XP boost to all skills. You will get the maximum XP boost if you wear at least 5 items out of this set. They do not stack with the other skilling outfit XP boosts. Unfortunately, the rewards for the achievement points are not in game yet.
Next to her we have the wise old man who sells skill capes. When you've reached 99 in a skill he will sell the regular skill cape, if you've prestiged a skill once and reached 99 again he will sell the trimmed variant as well, if you've prestiged a skill 10 times and reached level 99 again he will sell a custom mastery cape of this skill, a way to show off your perseverance. Every skill cape has a unique feature, boost or ability. Every higher tier also has the lower tier effect. So the mastery cape will have it's own effect, and the effect of it's trimmed and untrimmed variant. % effects do not stack. The max cape, and all of its variants, also gives you all of the untrimmed skill cape effects. When you've prestiged your skills once and reached 99 again, you can buy the prestiger cape, which gives you both trimmed and untrimmed effects when worn. When you've prestiged all of your skills 10 times, you can buy the prestige master cape, which is arguably the best cape in the game, providing you with all of the mastery, trimmed and untrimmed cape effects of all skills when worn. Check our skill capes guide to see learn all unique effects, links down below.
Next to the Wise Old Man you'll find Patchy the Prestiger, where you can prestige your skills and buy rewards off, which i talked about earlier in this guide. Next to Patchy you will find the Genie who can reset your combat skills, which is especially handy for pures who wish to reset their combat skills. This can be done at any level and will not award you prestige points. At last we have the make-over-mage where you can change the appearance of your character.
Before heading to the northern part of home you will see the event chest, where you can get use your event keys on for some loot. Examine the chest to view its drop-table!
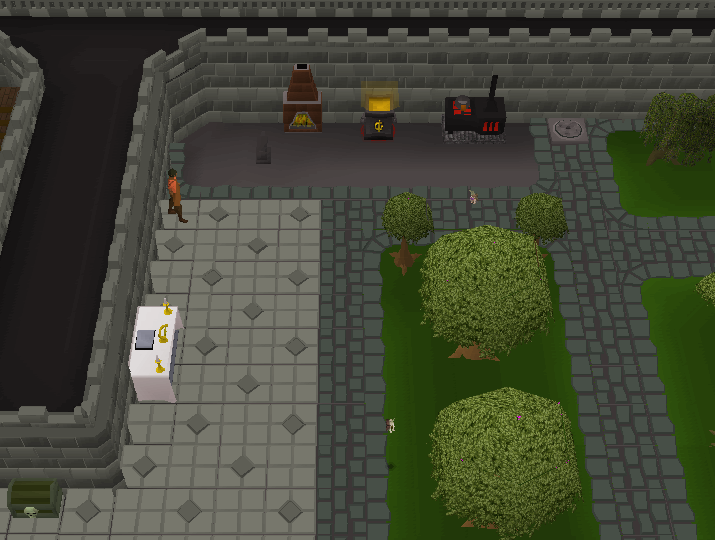
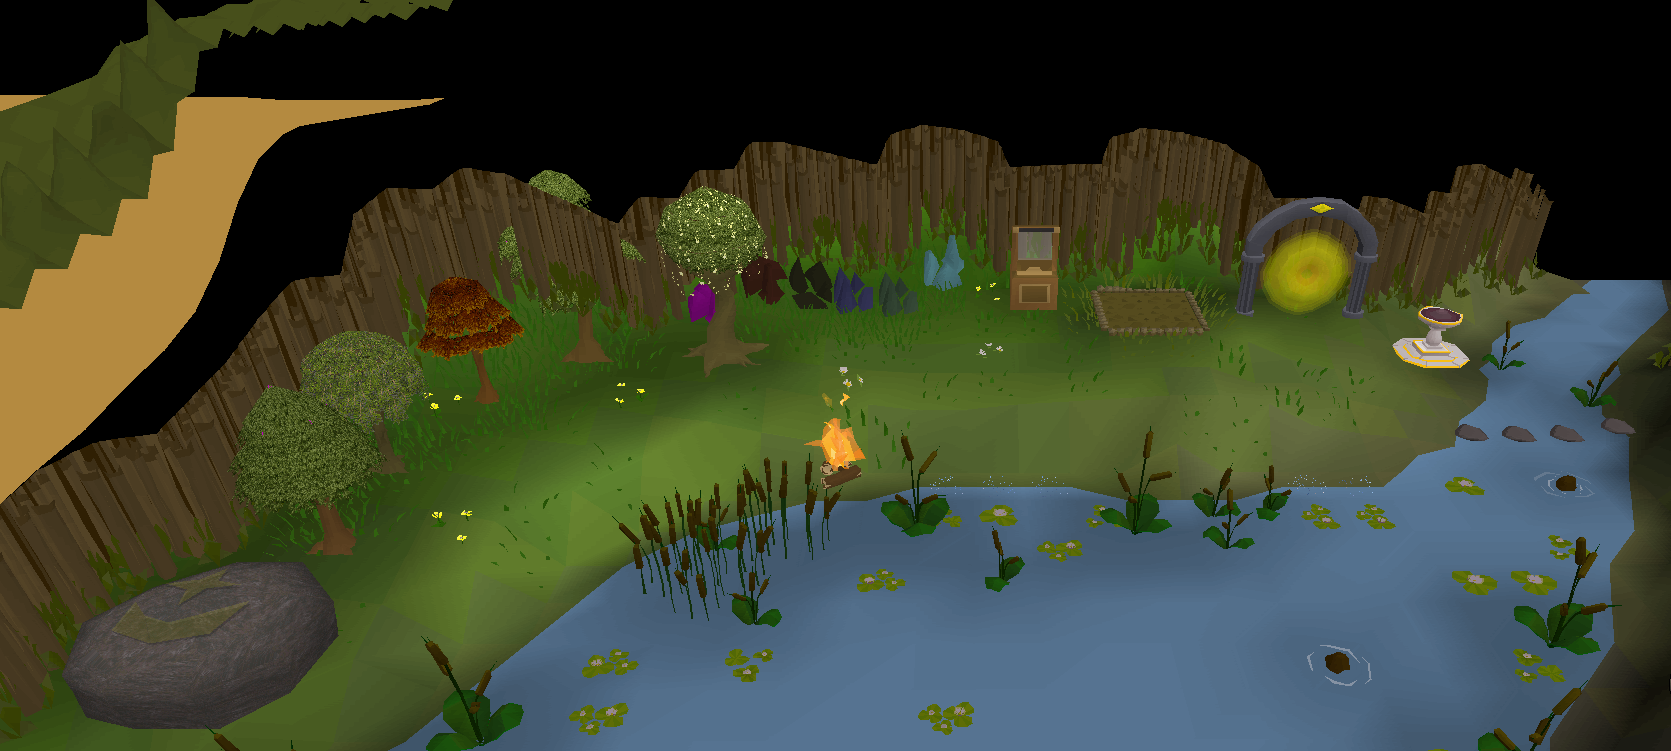
At the other side of the wall you will find a prayer altar where you can recharge your prayer as well as prayer xp if you offer bones at this altar. In the corner we find Ellis who can tan your hides to craft leather pieces out of them. You can use this small skilling area to cook, craft, smith and smelt as there is a bank box in the middle as well.
In the middle area of the Northern part of home you can train woodcutting as most of the trees in game are in this area. In the centre you will find the Well of Goodwill. Donating items or gold to the Well of Goodwill provides double XP to everyone logged in for a limited amount of time! An hour of double xp costs 50M, but you can donate lower value of items or cash as well. Note that duplicate pets obtained by skilling or PVMing can be 'donated' in the Well of Goodwill as well for some double xp!

North of the home area you will find the fishing training area, where you can, well... fish! There is a fishing shop who will sell you all of your required supplies, as well as a bank box to quickly store your collected fish.
At last, on the east side of the northern part of home you will find the thieving area. The merchant here has some stalls here where you can buy (steal) items from. You can sell the bought (stolen) items back to the merchant right away. Isn't that great? Make sure he doesn't catch you though...

RuneRealm also has 5 custom donator areas which you can access after you've donated a certain amount.
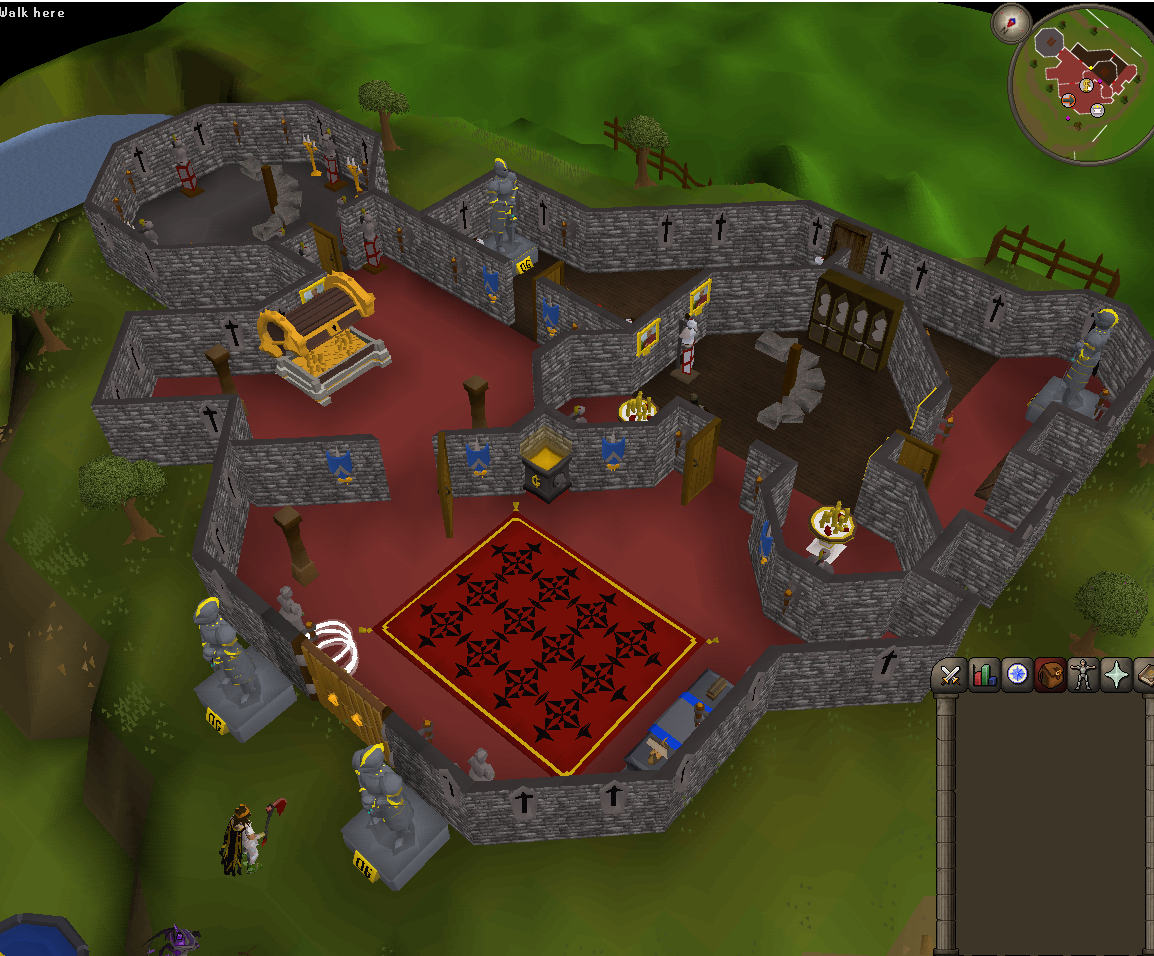
Donator zone
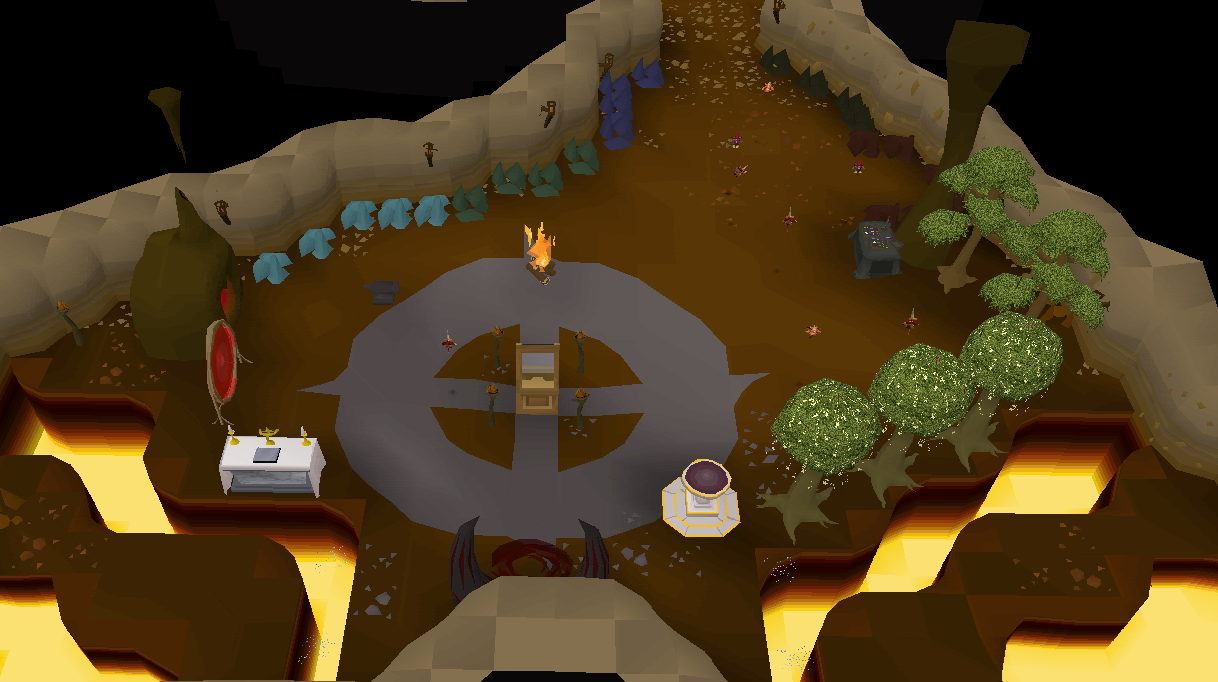
Donators and higher can teleport to this area by typing ::dz or selecting the teleport in the cities teleports menu. You will enter a small area with various skilling activities available, a portal to the Corrupt Sorceress boss and a quick teleport to the Fountain of Rune where you can imbue Dagannoth king rings but beware, other players might find out you are in this dangerous area...
You can walk north farther into the donator zone where you can find some monsters such as Kraken, Abyssal Demons and Dark beasts. At the end is a runecrafting altar as well. Note that woodcutting and mining in this area does not allow you to switch to another tree or mining rock after every other chop or cut. You can use the fire for either firemaking or cooking training. Skilling in this area gives a 20% xp boost.
Super donator zone
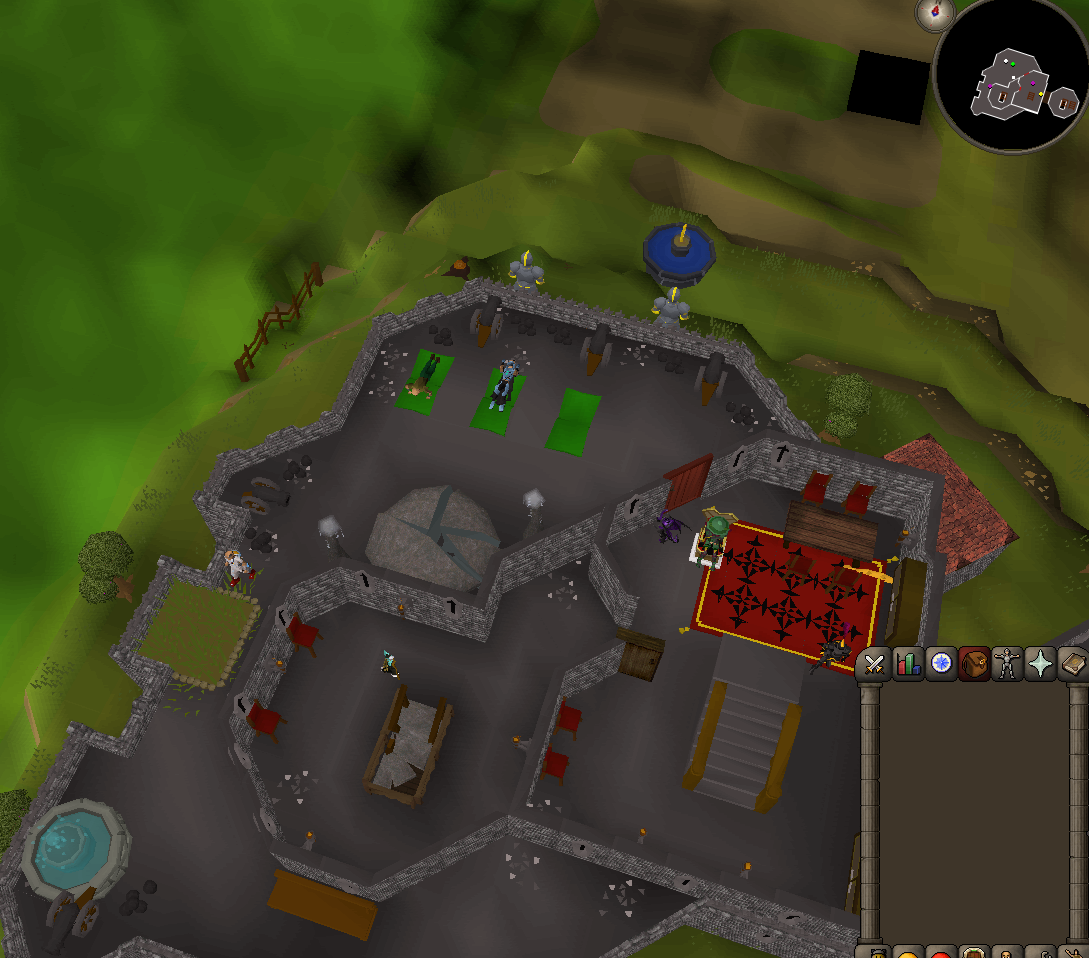
Super donators and higher can teleport to this area by typing ::sdz or selecting the teleport in the cities teleports menu. You will enter a natural area with some various skilling activities as well and a bank. There is also a portal here to the Corrupt Banker boss, which is only available to Extreme Donators and higher. If you walk south and cross the bridge you will enter an area filled with crystal monsters which drop PvP armor and weapons. The PVP armor is upgradeable to tier 5, currently being the best armor in game. Every upgrade requires 3 pieces of the previous tier. Weapons are not upgradeable. If you walk all the way north to the waterfall, you will see a barrier to the Sponsor Zone, which is only accessible by sponsors. Skilling in the super donator zone gives a 30% xp boost.

Sponsor Zone
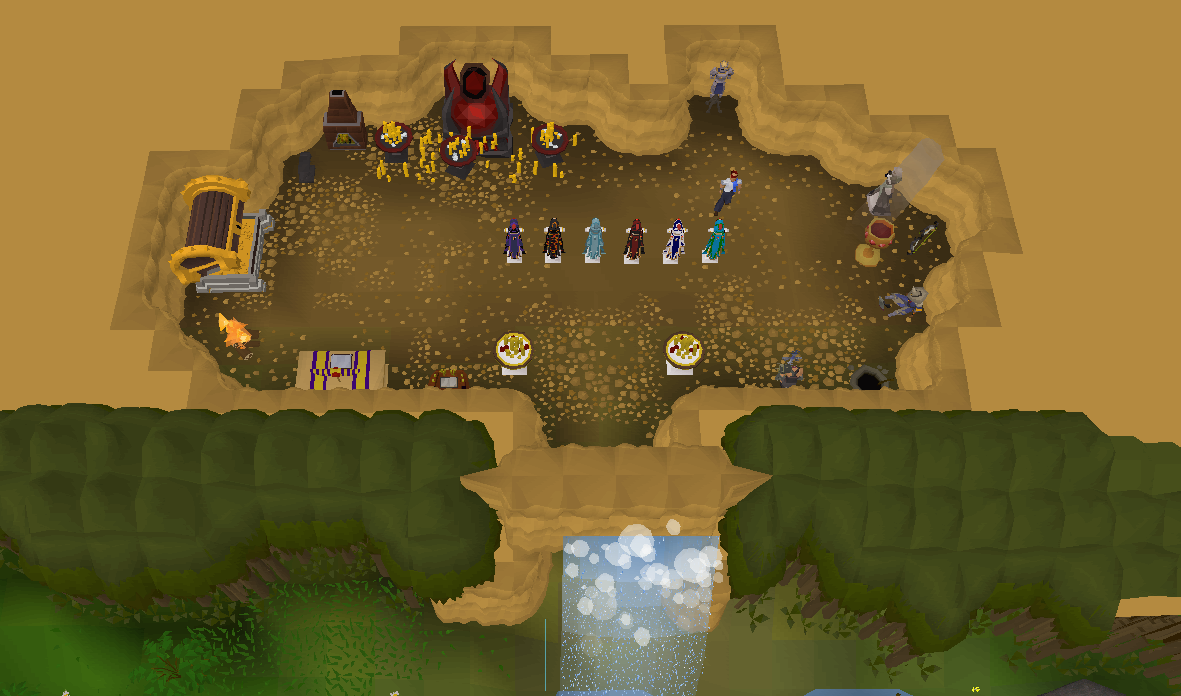
Sponsors and higher can teleport to this area by typing ::spz, selecting the teleport in the cities teleports menu or walk through the barrier under the waterfall in the super donator zone. You will enter a small area where you can also perform some various skilling activities. On the west side you will find a big chest where you can claim a treasure every 12 hours. Most of the skilling activities here are the best xp/h in game. You can also buy the best in slot tier max capes here, provided you own the right capes. Click on the cape stands to find out which capes you need. You can talk to Party Pete to open a custom shop with various cosmetics to show off your wealth. On the east wall you will find a super chalice which you can drink, giving the same effect as the rejuvenation pool, but also overloads you. This means it boosts all your combat skills (except prayer and hp) 20% over it's maximum for 5 minutes. In the southeast corner you will see a small hole which gives access to the superior slayer monster area, this area is only accessible for Super Sponsors and higher. This cave is filled with Superior Slayer monsters, that would normally only spawn occasionally on a slayer task.
Super Sponsor Zone
Super sponsors and higher can teleport to this area by typing ::sspz or ::ssz or in the right-click menu from the home teleport button in the spellbook. All skills performed in this area receive a 50% XP boost. When you teleport here you stand outside a castle. This castle is only accessible for elite sponsors but, do not feel disappointed, as outside of this castle are a lot of activities you can do with some of the best XP rates in the game! When you follow the path, past the Well of Goodwill and go south, you will reach the skilling area in the Super Sponsor Zone. You will find a short agility course, despite its length, it gives one of the best xp/h (taking the 5 tickets reward per round in calculation). There are farming patches, mining rocks, trees, a bonfire to cook or train firemaking and even a Wrath Rune altar. South-east from here are 2 hunter areas, the first one you see has all imps but dragon and lucky implings. The one more to the south only has dragon and lucky implings, giving the best hunter xp and loot in game. Directly to the east from the skilling area is a crystal dragon area, where you can kill crystal dragons for their famous PvP armor. South from the crystal dragons is a fishing area where you can... fish. When you traverse this area you come across a white portal at every section. You can use these portals to travel quickly to other areas. Elite sponsors can even use the portal to teleport inside the castle. You can right-click a portal to set it as your main. Every time you teleport to the Super Sponsor Area you will then go to the area you set as your default. Each area also has a bank or banker-pet, available for everyone for quick banking. Side note: The Super Sponsor Area and Elite Sponsor Area where added on the 2-year anniversary update of RuneRealm. To thank the earliest top donators of the game, who've been a big part in increasing it's success, ten statues of each of them have been added throughout this area. Examine the statues to get to know them a little better.
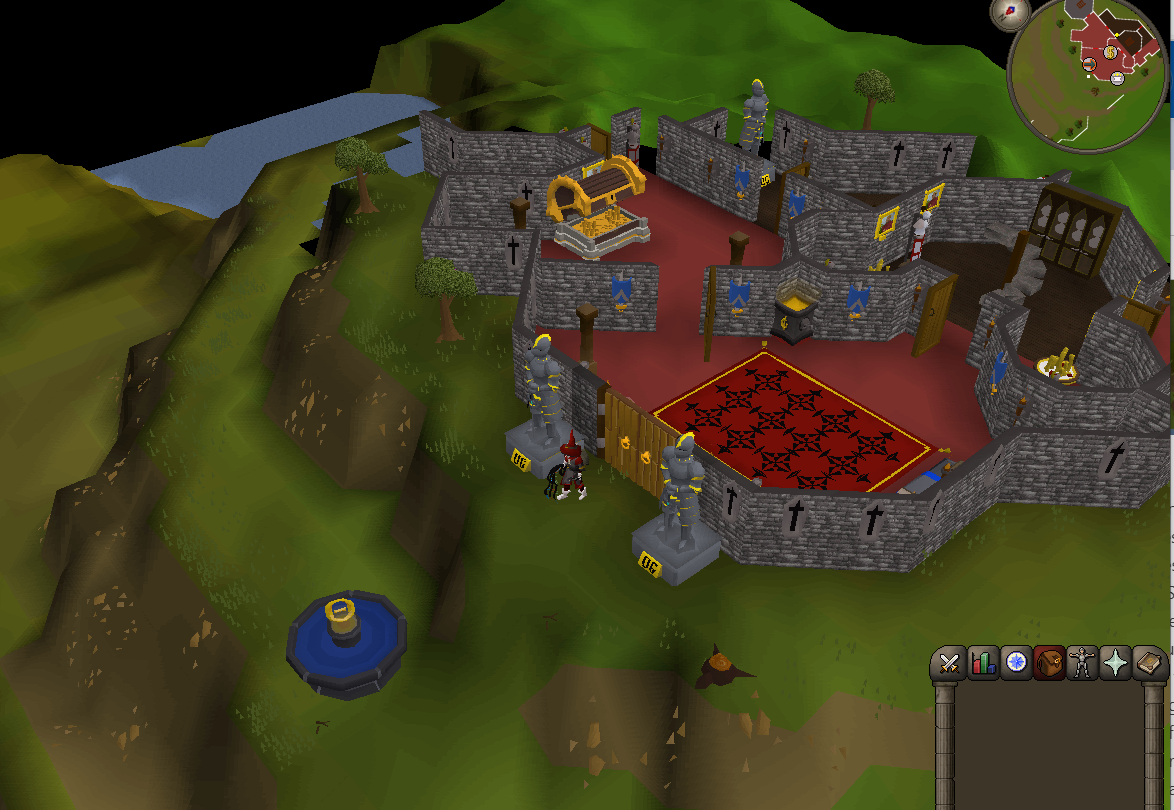

Elite Sponsor Area
The Elite Sponsor Area is only accessible for Elite sponsors, who can use ::espz or ::esz, or right-click the home teleport button in the spellbook and click elite sponsor. You will find yourself inside the castle at the Super Sponsor Area. All of the XP you gain in this area is boosted by 50%, thus granting the highest area XP boost in the game. On the ground floor you will find a bank, a prayer altar to train prayer, some thieving stalls to train thieving, a coins/blood money thieving stall, for the most money hungry thieves, and a sponsor treasure chest. Unlike the chest in the sponsor area, you can loot this chest every six hours, rather than twelve hours. Note that both chests share a cooldown. Upstairs you will find an AFK training area. You can set your account here for six hours every 24 hours, to let it train for you afk. As soon as you go through the door, the timer will start. You can set your character to train agility, runecrafting or farming. Unlike in any other area, your character will not go 'afk', thus performing the skill the whole time you're in here, for a maximum of six hours. While the XP rates are of course lower than outside the area, you still have to do nothing to get XP, and you even collect AFK points every now and then, which can be spend at the Prestige Master, outside of the AFK zone.
Getting started
If you've read this guide and your asking yourself, where do i start? Well that is of course up to you! If you like skilling, go train up your skills, skilling at the home area gives a 10% xp boost as well. if you want to kill bosses and fill your collection log, train your combat stats. Check out the combat teleports to find a suitable training area. If you want to make money fast, try out hunter or thieving! Good luck and most of all, have fun! Feel free to ask any questions in the help clan-chat or on discord!
Links
Our home page --> www.runerealm.org
Our rules --> https://wiki.runerealm.org/books/starter-guide/page/runerealm-game-rules
Join us on discord -->https://www.runerealm.org/discord
Check our donation perks in our store www.runerealm.org/store
Make sure to vote frequently for voting points and unique rewards --> https://vote.runerealm.org/
Guides
Our wiki --> https://wiki.runerealm.org/
Fight Caves guide --> https://wiki.runerealm.org/books/fight-caves-guide
Inferno Guide --> https://wiki.runerealm.org/books/inferno-guides
Raids (CoX and ToB guides --> https://wiki.runerealm.org/books/raids-guides
Slayer task locations --> https://wiki.runerealm.org/books/slayer-task-locations
Quest guides --> https://wiki.runerealm.org/books/quest-guides
Drop rates guide --> https://wiki.runerealm.org/books/drop-rate-guide
Skill cape perks guide --> Perks Table | RuneRealm Wiki
Equipment guide --> https://wiki.runerealm.org/books/equipment-guide
Money making guides --> https://wiki.runerealm.org/books/money-making-guides
No Comments